

Azure has a nice solution to bring on-prem web based applications safely into the internet: Application Proxy is the solution.
Introduction
Often companies have on-prem web applications which should be accessible by Azure users. Azure provides a possiblity to bring such applications savely to the internet. The solution is called Application Proxy.
What is Application Proxy?
An Application Proxy consists basically of two parts:
- Application Proxy Connector: Runs on a system in the on-prem network and makes a secure connection to Azure, more precisly to the Application Proxy Service. Additionally this connector makes also connections to the published web applications and works like a Reverse Proxy .
- Application Proxy Service: Counterpart of the Application Proxy Connector. This component will receive secure connections from the Service of the on-prem system and tunnels all web requests from and to the internet without exposing internal systems directly to the internet.
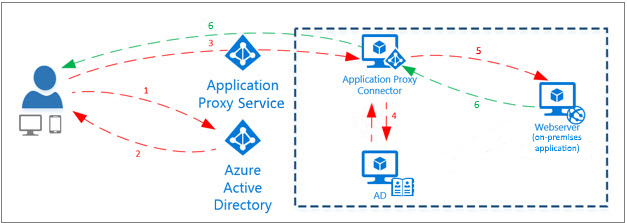
The big benefit is that now before an user can access the so published on-prem web application has to authenticate against Azure AD. There all security features can be used like MFA and Conditional Access. Only if the user passes the Authentication he is able to access the on-prem web application.
Application Publishing Walkthrough
Preparation
To publish an Application with the help of Application Proxy you have to basically do the following steps:
- Go to https://portal.azure.com/
- Navigate to Azure Active Directory, Application Proxy (marked as 1)
- Download the connector service to your dedicated Application Proxy server in your on-prem enironment (marked as 2) and install the service. Make sure that the server has internet connection (at least to the Azure cloud)

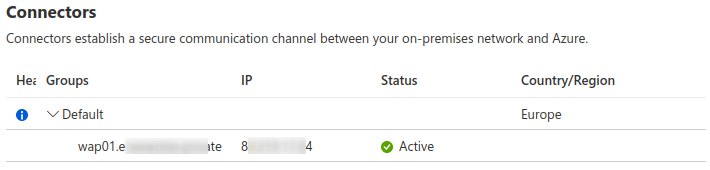
- Go back to the Azure console; you should see that the connector is now connected.
Now you are ready to publish your application!
Application Configuration
To publish your application just go again to the Application Proxy console (see image above) and hit on Configure an app to start setting up your application:

- Maintenance Mode: if set to yes access to your on-prem application is blocked with a maintenance note.
- Name: Give your application a name. This name is afterwards visible also to your users in the application overview.
- Internal Url: Define how the Application Proxy Connector can access your application. Make sure that the system can access target system with given Url.
- External Url: Define which Url should be used for external access. Beside of using a different name from the name you defined earlier, you have to opportunity to select different domains; if you are using
-<tenant>.msappproxy.netor.<tenant>.onmicrosoft.comcertificate handling is done for you by Microsoft (Wildcard certificate). If you want to use your own domain you have to supply an manage the certificate yourself. - Pre Authentication: This setting is important. Only if you are using
Azure Active Directorythe user must authenticate against Azure. If you are switching toPassthroughthe user will get forwarded directly to the publisheed application without the need to authenticate against Azure AD. - Connector Group: If you have more than one Connector group you could choose which one should be used.

This settings needs to be touched barely. Typically they are needed to address issues with application which do not co-operate properly with Reverse Proxies (as Application Proxy is).
- Backend Application Timeout: How long should the Application Proxy wait for an answer from the backend system.
- Use Http-Only Cookie: Cross Site Scripting (XSS) protection.
- Use Persistent Cookie: Cookie will survive a browser restart (for session persistence).
- Translate Urls in headers: The normal behaviour of a Reverse Proxy. Some applications have issue with this so if you encounter problems try to disable this function.
- Translate Urls in application body: Some applications are using static internal Urls for referencing resources. Due they are published to the public such Urls are not accessible. Application Proxy is able to rewrite to some degree such Urls. It is worth to give this function a try if you encounter problems regarding pointers to wrong resources (check source code of the delivered web pages to identify such Urls).
- Validate Backend SSL certificate: If your internal system is using HTTPS with a self-signed certifcate and/or from your own PKI you have to disable the certificate validation.
After you defined all required settings hit Create.
Edit Application Configuration
Now you created your application but have to tweak some settings. Your application was created as an Enterprise Application. Go to Azure Active Directory → Enterprise Applications and select there your application.
The settings we saw above can be found under Application proxy.
User Permission
One important aspect is to define who will get access to the published application. You define this in the section Users and groups of the application. Only users and/or groups which are listed here have access to the application.
Single Sign-On (SSO)
By default Azure is an additional authentication layer in front of your published application. Often it is desired that you provide some kind of Single Sign-On (SSO) to your application. Application Proxy provides following methods to provide SSO functionality to your application:
Header-based SSO . Remark: No Baerer Authentication possible with this type of SSO.
Password-based SSO . Make sure that you set
Pre AuthenticationtoPassthroughbefore detecting login fields. Switch back after you detected successfully the login fields. After detection of the fields you can assign static credentials to the assigned users/groups in the corresponding setting section.Remark: If authentication form is not properly detected you can use an Edge plugin to identify the fields. But this extension is also needed later on to login. Often not a desired solution.
SAML-based SSO For detailed configuration see the provided links to the documentation.
Troubleshooting Hints
Solutions for most common problems with web applications are listed here in the order how you should try to address them.
No connection to the backend
Of course your system with installed Application Proxy Connector needs to have access to the target system (and also needs access to Azure Cloud). Try following steps:
- Open internal Url (you defined in the Azure Console as
Internal Url). This should work. If not you have an internal connection issue. - If your Url has
httpsin it try to disable settingValidate Backend SSL certificate. - Open Azure Portal. If it is not working your system is not able to connect to Azure (and the connector wouldn’t be marked as “Active” in the portal).
Weird application output or error messages
Most probably your application has issues to interpret requests from the internet which are proxied by the Application Proxy. Try to disable Translate Urls in headers as first step and check if it solves your issue.
If you see missing images and/or non working links in your application (especially because internal Urls are reference instead of your external specified Url) you should give the setting Translate Urls in application body a try. Check then if those Urls then are properly handled.
Generic
It could also be that you have to tell your application that it is used behind a Reverse Proxy. For this check the manual of your application.