

Azure Batch is quite powerful tool if you want to scale compute intensive tasks in your environment due it lets you manage scaled workload in Azure. This article will present counter measure to reduce the risk of misuse.
Introduction
Some days ago my collegue Stephan Berger wrote an article about an Incident Response case where Azure Batch was misused to launch a bunch of CoinMiner in the customer environment.
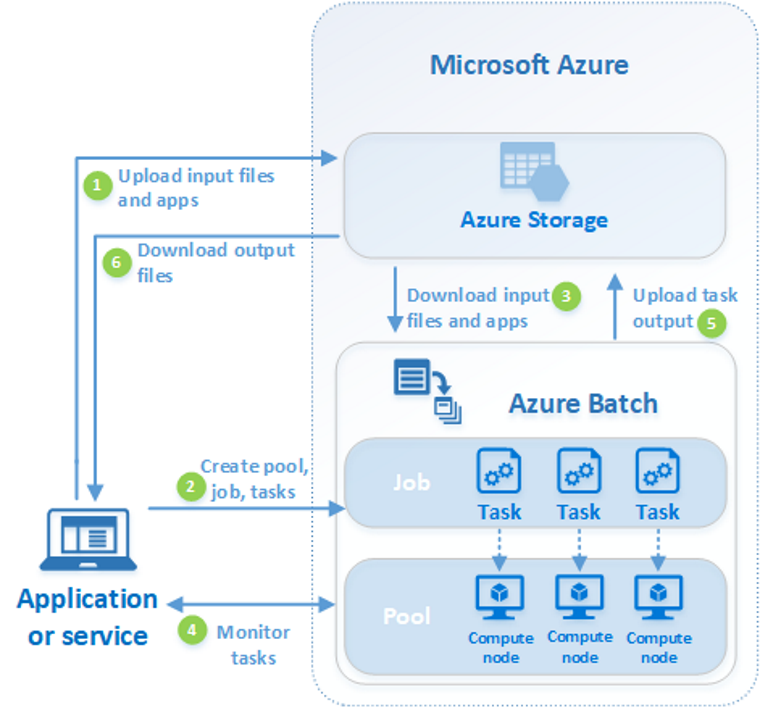
There you will also find a detailed description how to setup an Azure Batch environment. Please invest some minutes to read the linked article to get more background information regarding Azure Batch and how it was misused in the documented incident response case.
In this article I want to show you how you can protect your environment from misuse of your resources. For this purpose I will give you several approaches to protect your environment. As usual for security topics there is not a one fit all solution - it is more a layered approach to get you more secure.
Possible Mitigations
Authentication
Well guess what will come! You are right: Multifactor Authentication (MFA). This is the most important pillar to protect your accounts. Make sure that all your users have to use MFA. If you are on the Entra ID Free Level make sure that Security Defaults are active - if you have at least Entra ID Premium Plan 1 in place make sure that appropriate Conditional Access (CA) policies are in place which will enforce Multifactor Authentication and covers all users.
Additional tipp: Try to use phishing resistant multifactor authentication methods - this adds an additional security layer because your users couldn’t be phished any more. Following MFA methods are phishing resistant (order shows implementation difficulty): Windows Hello for Business, Passkey, FIDO2, Certificate Based Authentication (CBA).
Permissions and Least Privilege
Well; you expected already that permission management and the concept of least privilege would help to protect your environment. So you have to think about the RBAC of Azure so you are able to perform all needed actions.
We will do an assumption here: You are typical Azure customer which is using only the Microsoft 365 part - meaning that you have enrolled a tenant so you are able to use Software as a Service (SaaS) Solutions like Exchange Online, Teams or SharePoint Online. From this point of view you have typical no requirement to be able to deploy Infrastructure as a Service (IaaS) components. In this case it make sense to limit the permission to create new resources in your tenant to some dedicated users.

Bottom line: You have to assign Azure roles to your Azure scopes
(labeled as Subscription, Resource Group and Ressource) and the roles are not related to Entra ID roles (simplified).

Role Reader
This role allows to view all resources, but does not allow you to make any changes. This is the least privilege role - if a role is needed at all. Typical normal users do not need to be able view IaaS resources.
Role Contributor
This role is a privileged role and grants full access to manage all resources, but does not allow you to assign roles in Azure RBAC, manage assignments in Azure Blueprints, or share image.
Role Owner
This role is a privileged role and grants full access to manage all resources, including the ability to assign roles in Azure RBAC.
Custom Role
Of course you could create a custom role. If you are not experienced regarding the detailed scopes and permissions you can define you shouldn’t create a custom role and stick to the standard roles. Many requirements can already adressed with those standard roles.
Bottom Line
Only assign roles to your Azure scopes
if needed. Try to assign permissions on the upper levels of Azure scopes
. Limit the amount of users with privileged access to Azure scopes
. If a privileged role is needed use Contributor - for most tasks sufficient.
Privileged Identity Management (PIM)
Remark: This section is only applicable if you have an Entra ID Premium Plan 2 license!
It is good practice if privileged roles have to be requested with the Privileged Identity Management (PIM) functionality of Entra ID. This allows to work with the least privileges as possible and if additional privileges are needed they can be requested. Furthermore you have a defined process and are able to add additional counter measures like prompting for MFA (again).
Defining an eligible role for Azure resource
This section describes how you define an eligble role for a specific user. Find after the gallery an explaination how to do the setup.

So here are the steps how to define an eligible role:
- Go to https://portal.azure.com/
- Change to Privileged Identity Management by searching for this term
- Under
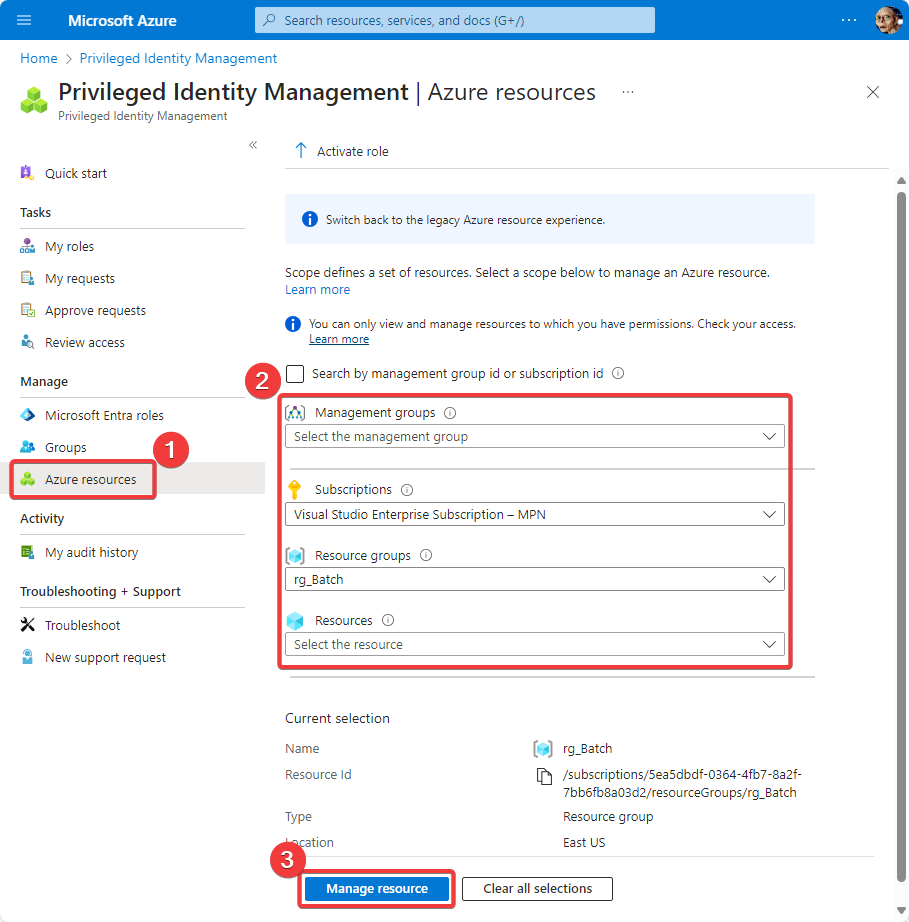
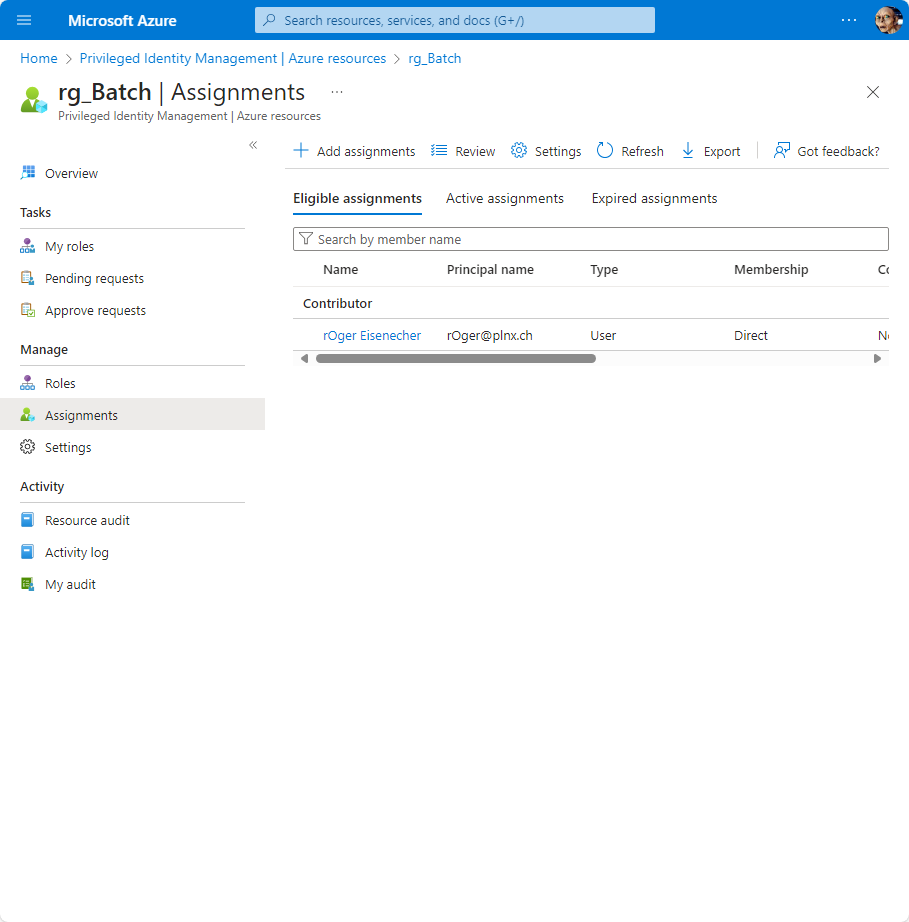
Manageclick onAzure resources - You will get first the selection for which scope you want to define PIM. In the example screenshot (first one) you will see that the selection is based on
SubscriptionswhereVisual Studio Enterprise Subscription - MPNand there the associatedResource groupscalledrg_Batch. Please note that the definition will be done on the most specific part you specified here. That’s the reason why in the following screen (second screenshot in the gallery) now referencesrg_Batchwhen you proceed with the next step. - Click on
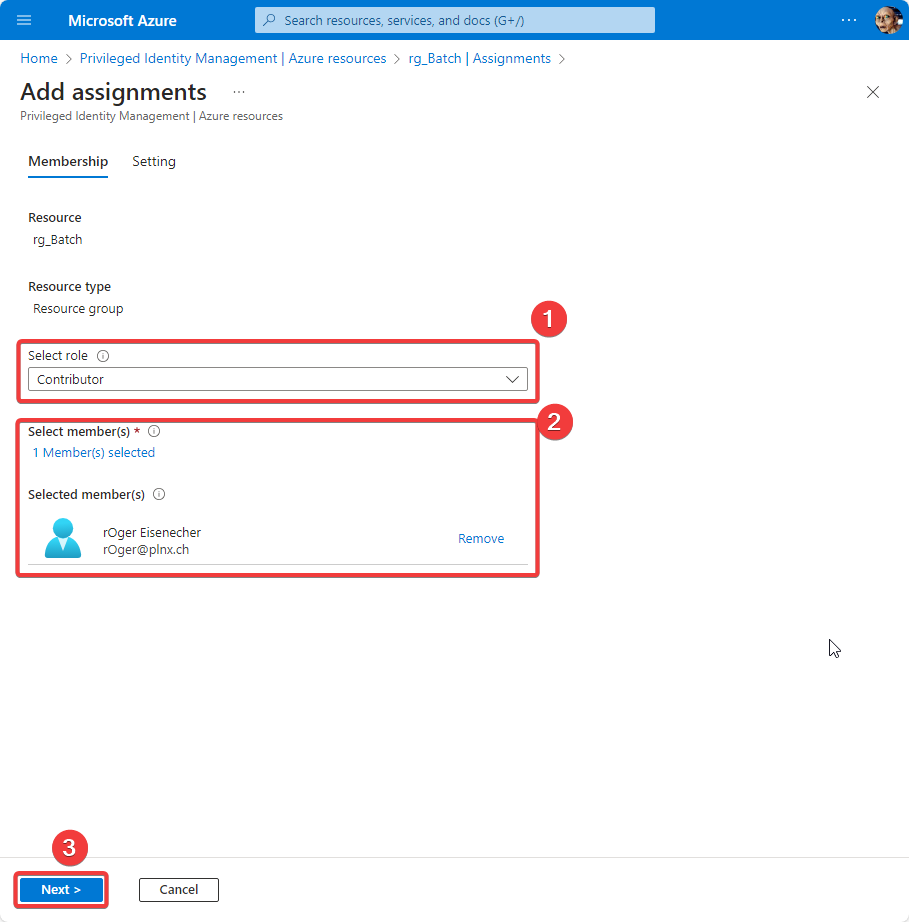
Manage resource(you will get to the second screenshot from the gallery) - Now here it is very similar to the normal Entra ID role assignment: Under
Manageclick onAssignments - Click on
Add assignments - in the appearing screen (third screenshot) select the role you want to make eligible, in this example
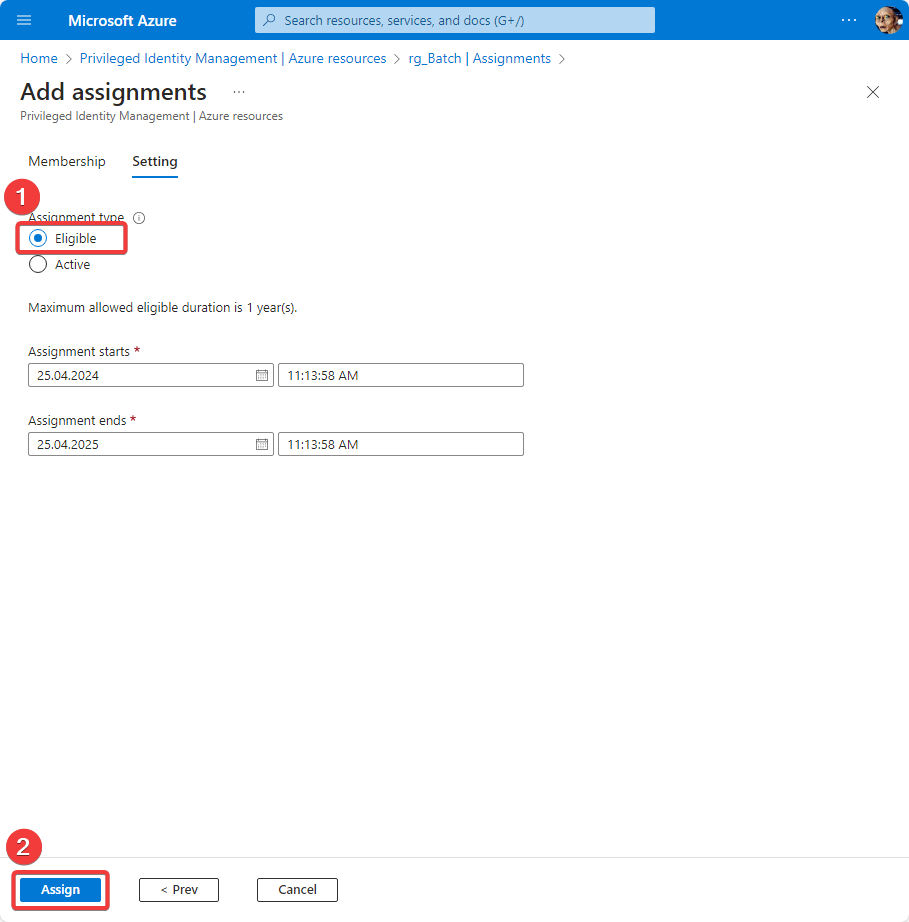
Contributorand assign members to this role, hererOger Eisenecher. Finally hitNext - Make sure that in dialog now
Eligibleis selected and hitAssign - Finally the definition is done and you will see an overview of the new defined assignment
PIM related settings for a role
Each role provide settings which define the process when a role get assigned (active, eligible). In the gallery below you will find screenshots of the previously assigned role Contributor - after the gallery you will find the settings you should consider.
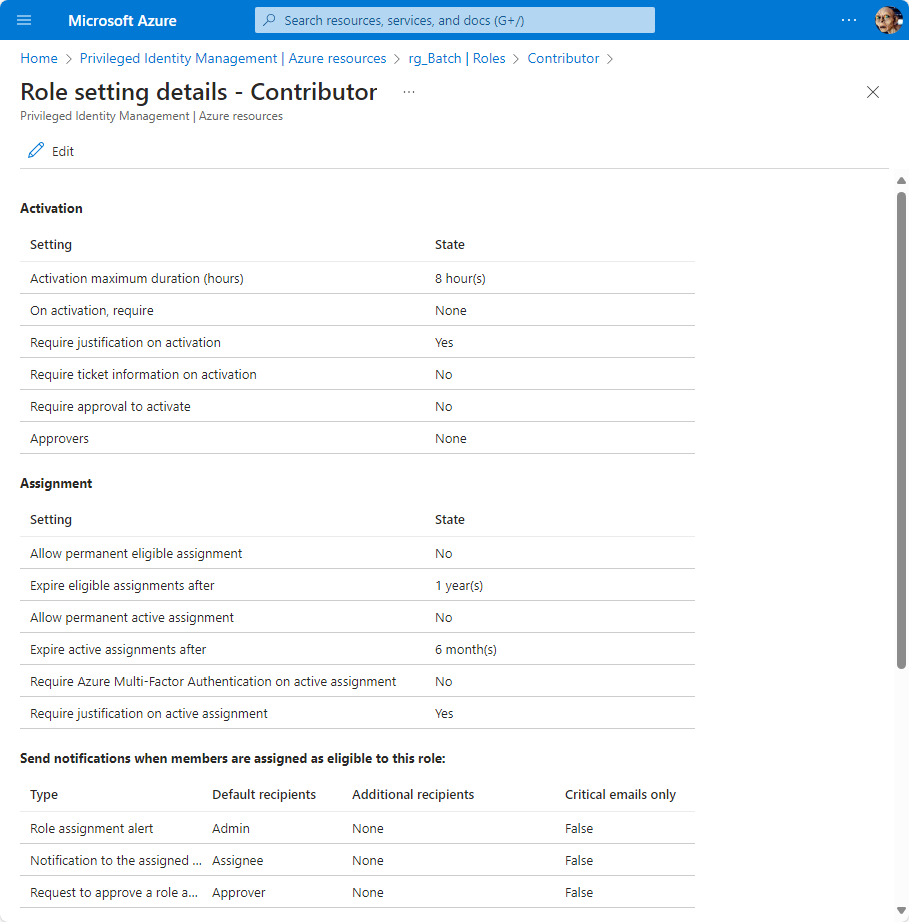
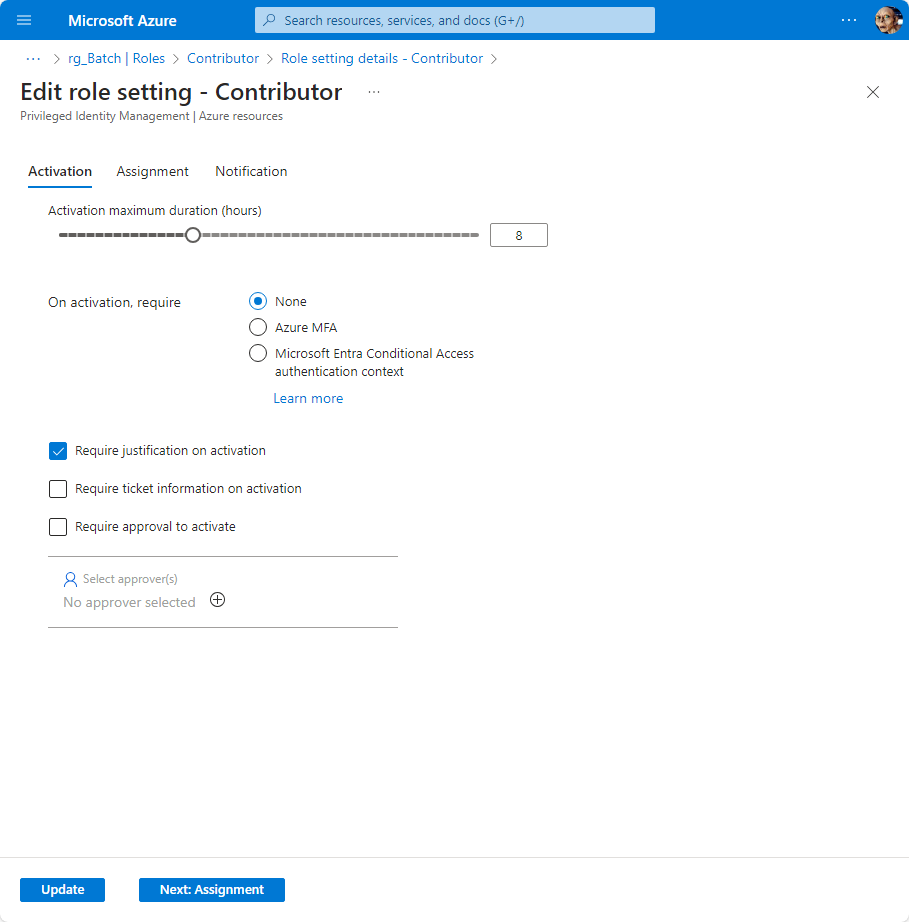
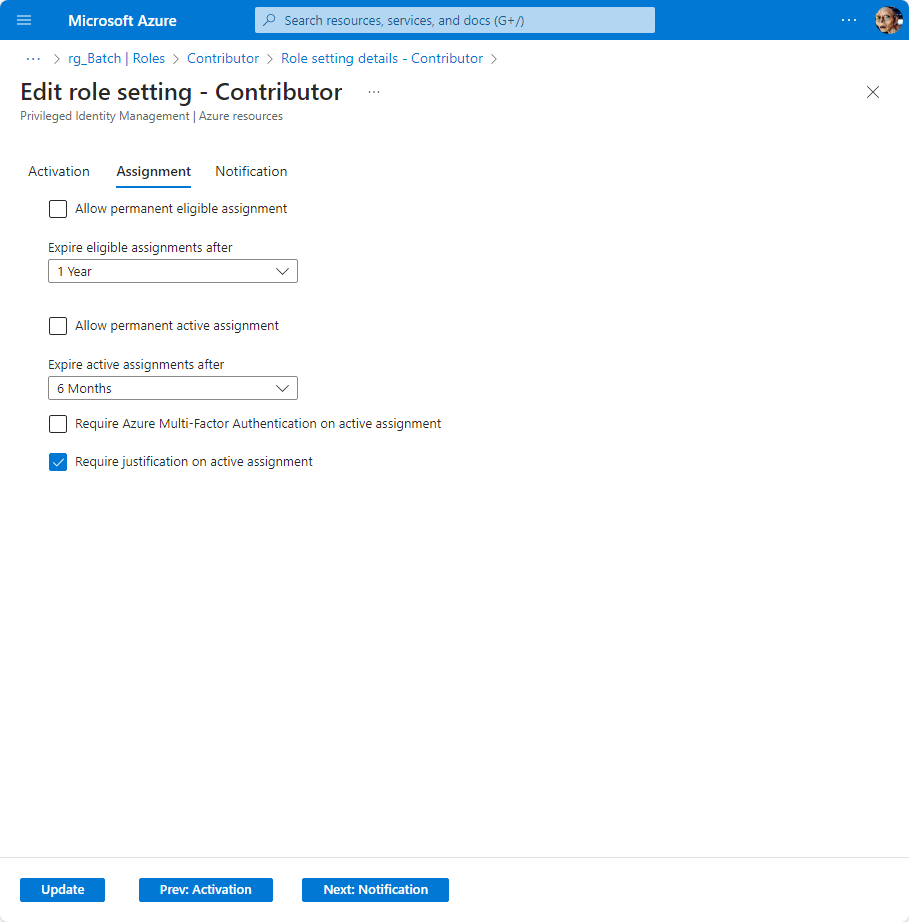
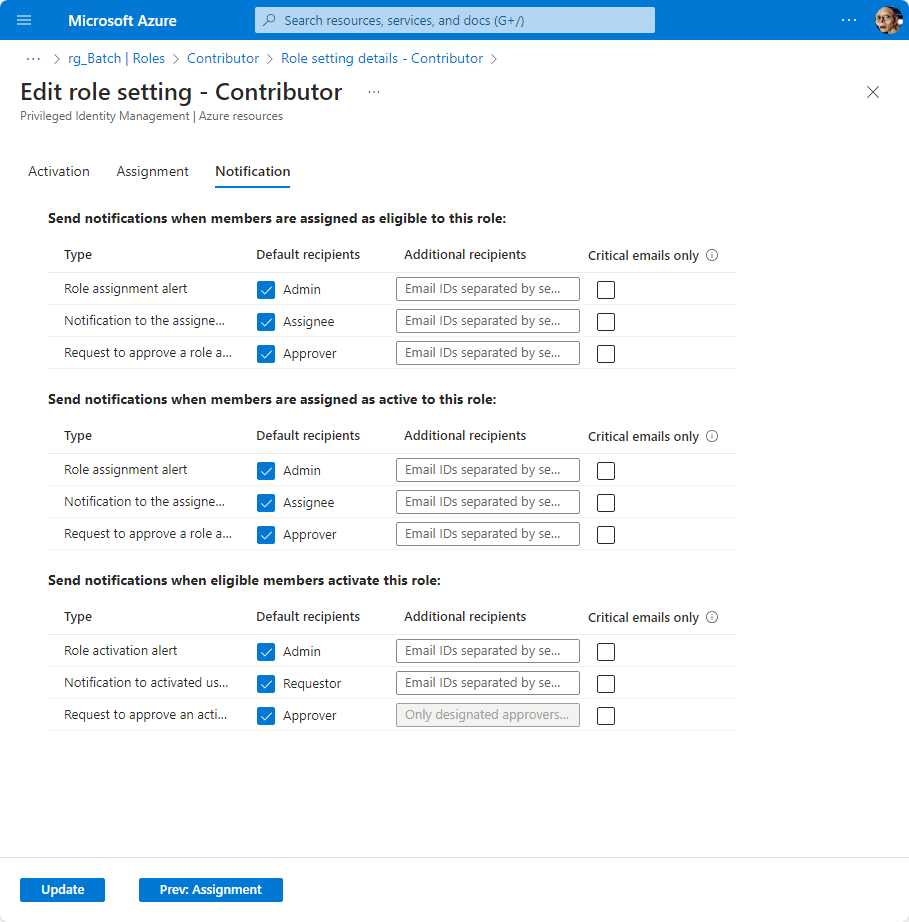
Following settings should be considered:
- Section Activation,
Activation maximum duration (hours): Default is 8 hours - but it should be further reduced to minimize the window someone can use a privileged role. Recommendation: 2 hours. - Section Activation,
On activation, require: Default is None. Recommendation: Azure MFA. - Section Activation,
Require approval to activate: Default is not active. Recommendation: For privileged roles you should consider to enable this function and establish an approval process. This means that another user (or group) have to give their approval for the use of the requested role. - Section Assignments,
Require Azure Multi-Factor Authentication on active assignment: Default is off: Recommendation: enable this feature. This means that if someone tries to make an active assignment that he will promted for MFA to make sure that it’s him. - Section Notifications: Recommendation: enable notifications beside of the default settings.
Structuring your tenant (Azure scopes)
To get a better understanding where and what you can do I will show you a simple overview of the typical tenant architecture:
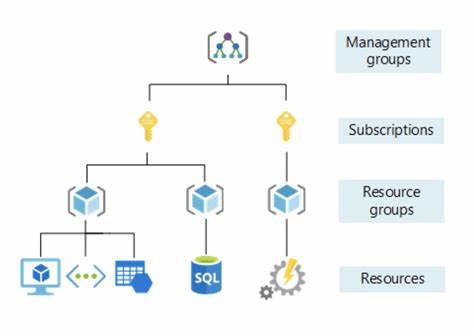
You should now the basic tenant structure. Those consist of the following elements:
Management group: top most level. By default each tenant has the so calledTenant Root Group. You as a company should think about the management structure of your tenant. By using a good structure you support the concept of seperation of duty, eg. Developers shouldn’t have access to productive environments. If you create dedicated management groups you are also able to easily adapt the permissions accordingly.Subscription: This is the Billing container. Each resource has to belong to a resource group which has to belong to a subscription. That’s the next level after the management group. As an example for security related workload a dedicated subscription should be created with tighter permissions and access only for users which have to deal with security related tasks. Depending on your needs it make sense to create additional subscriptions.Resource group: A resource group is a container for all resources which will be created.Resources: This is the lowest level and represents the created resource objects in Azure.
You should create a proper structure for your tenant. A helpful guide is the Cloud Adaption Framework (CAF) which contains templates for typical scenarios.

Management Lock
On the lowest level in Azure you have the possibility to define so called Resource locks. That’s just a flag which protects your resource so it couldn’t accidently changed or deleted.

The screenshot above shows the definition of a lock on the Resource group level (for rg_Batch). You can define two different locks:
Read Only: Disables write operationsDelete: Disable the ability to delete
The lock can be defined on scope level and all inherited objects will get the same lock applied (even when those objects are created later). Such locks avoid accidently changes or deletions.
The required permissions to create or delete management locks are a user with assigned role Owner or User Access Administrator.
Read Only could have unforseen impact on your resources; eg on a VM you can’t stop/reboot a VM any more due the lock (stopping or restarting is in the context of Azure a Write operation so logically a stop command could not be issued).Create an Alert rule
This final tipp is not a prevention method - it is a detection method! If you read the Azure Batch Incident Response case referenced earlier you also saw that each resource creates an Activity log. Based on those logs you could create an alert which sends you an email in case a new resource (Batch Account) is created. With that in place you will get informed as soon as someone is creating a new Batch Account in your subscription.
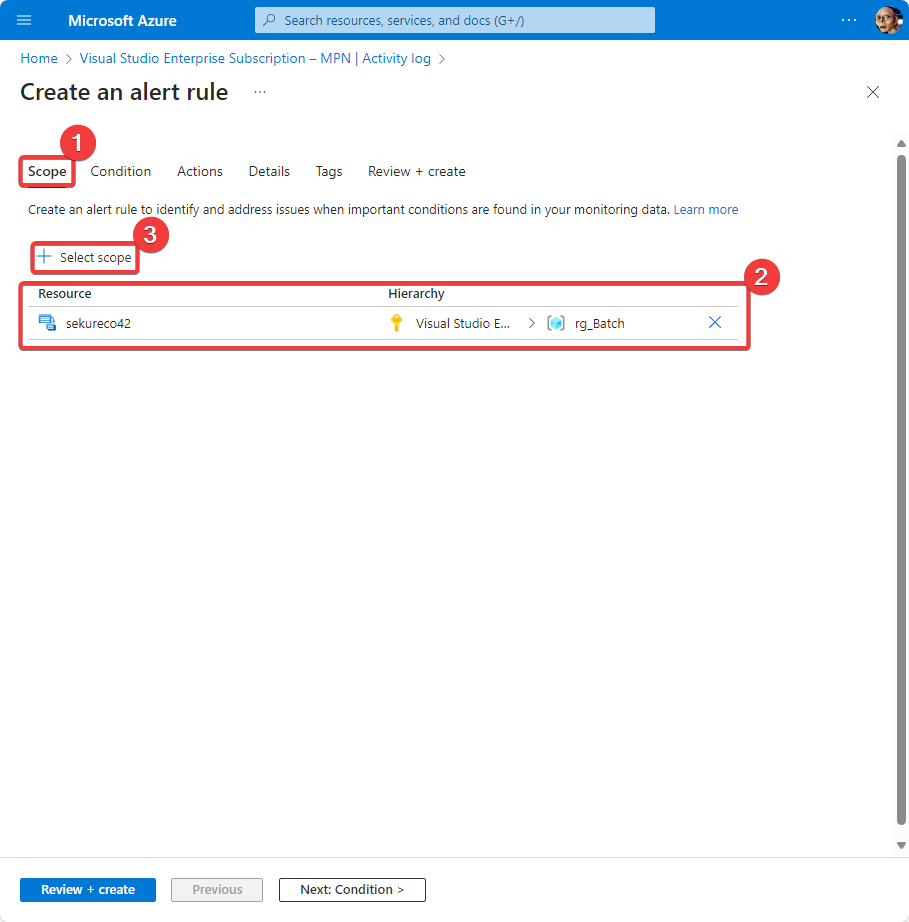
An alert rule makes the most sense on the subscription level. With that all future creations of resources get alerted. To create an alert you have to do following steps (detailed instructions after gallery of screenshots):
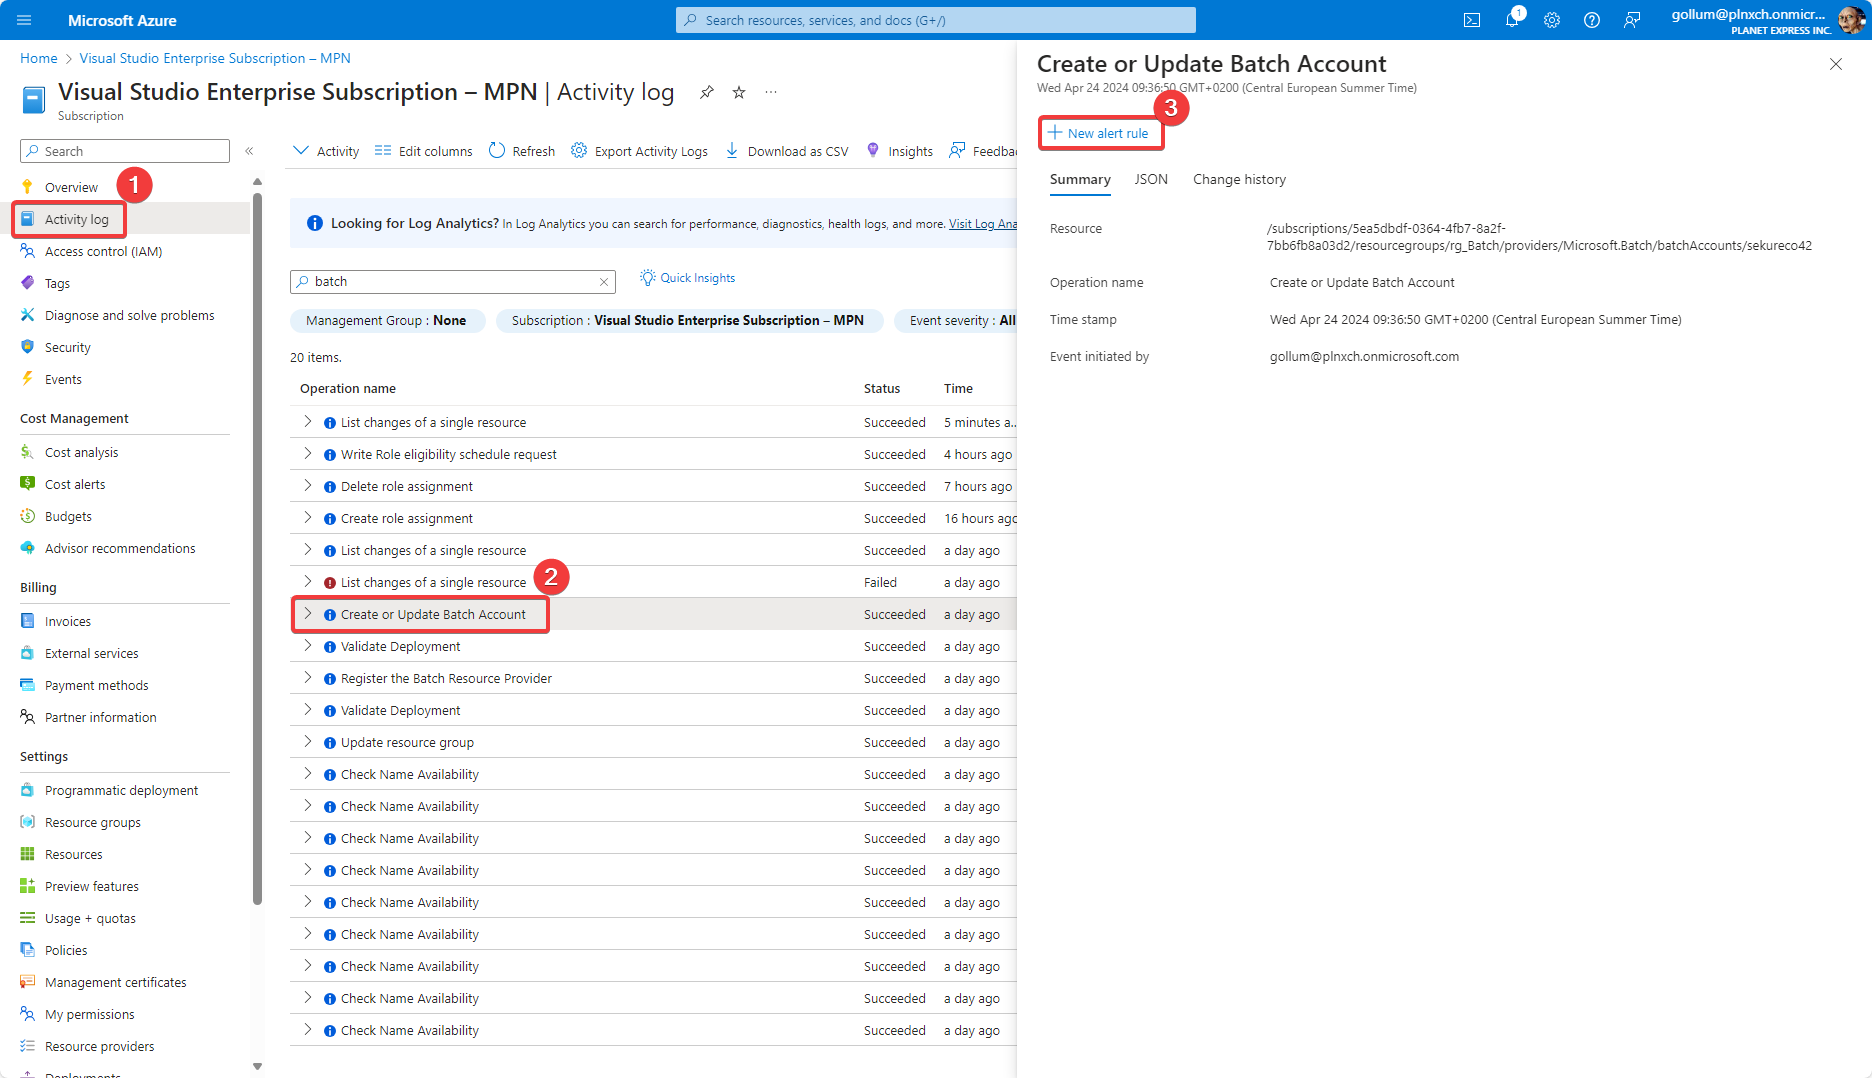
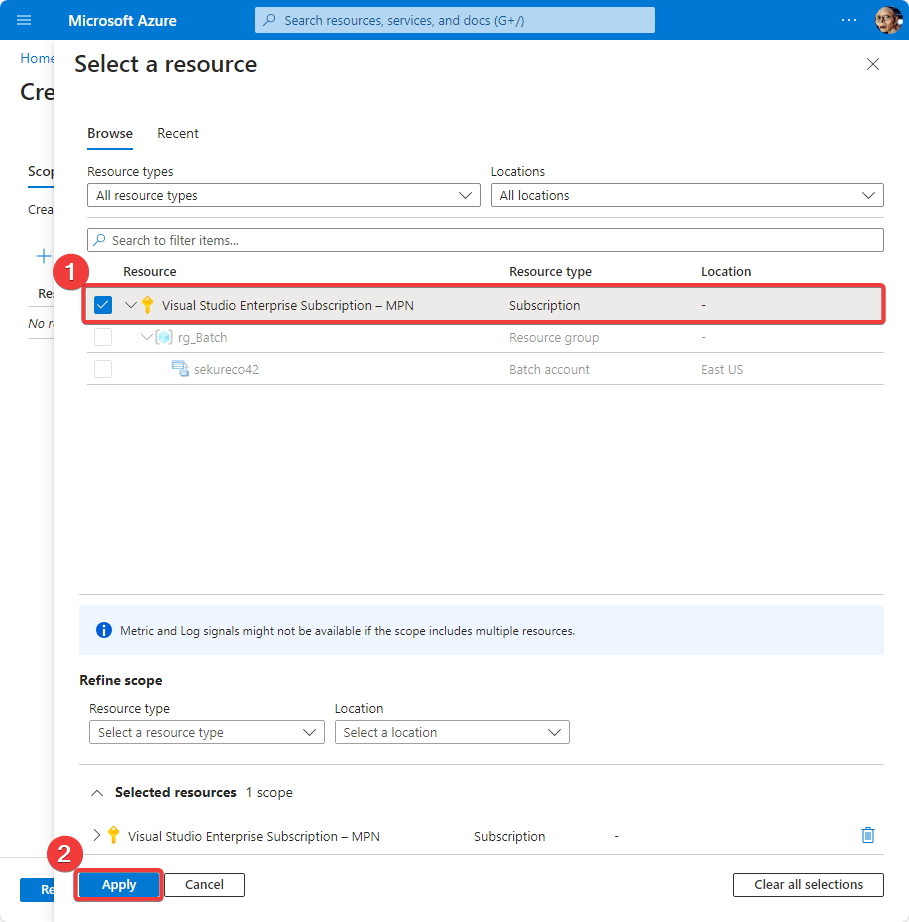

- Switch to the subscription where you want to add the alert rule
- Click on
Activity log, select a log entry and click on “New alert rule” (see first screenshot) - Switch to section
Scope(second screenshot). Make sure that you delete the existing scope (most probably specific to aResource group) - Select your subscription as scope (third screenshot)
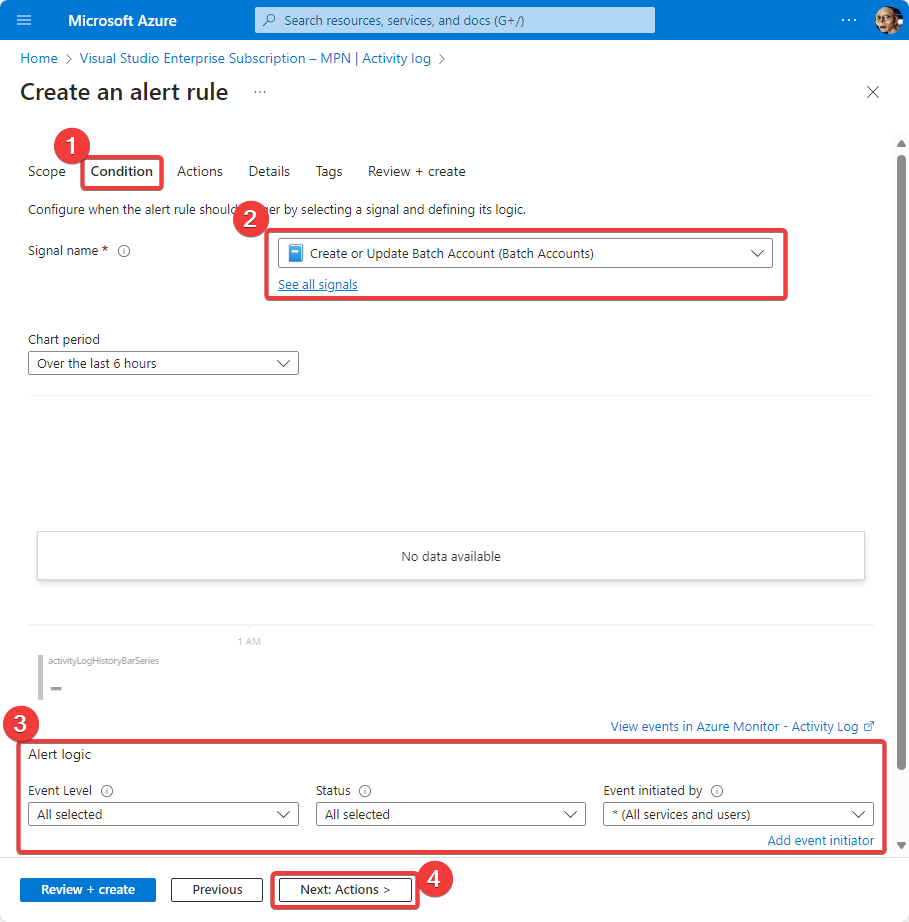
- Switch to section
Condition, make sure that you select as signal nameCreate or Update Batch Account (Batch Accounts) - Below make sure that under Alert logic everything is “selected” (fourth screenshot)
- In section
ActionsselectUse quick actions(fifth screenshot) - Due we want to send an email in case an Batch Account is created or updated fill in the fields accordingly (especially the desired reciepient for the alert email).
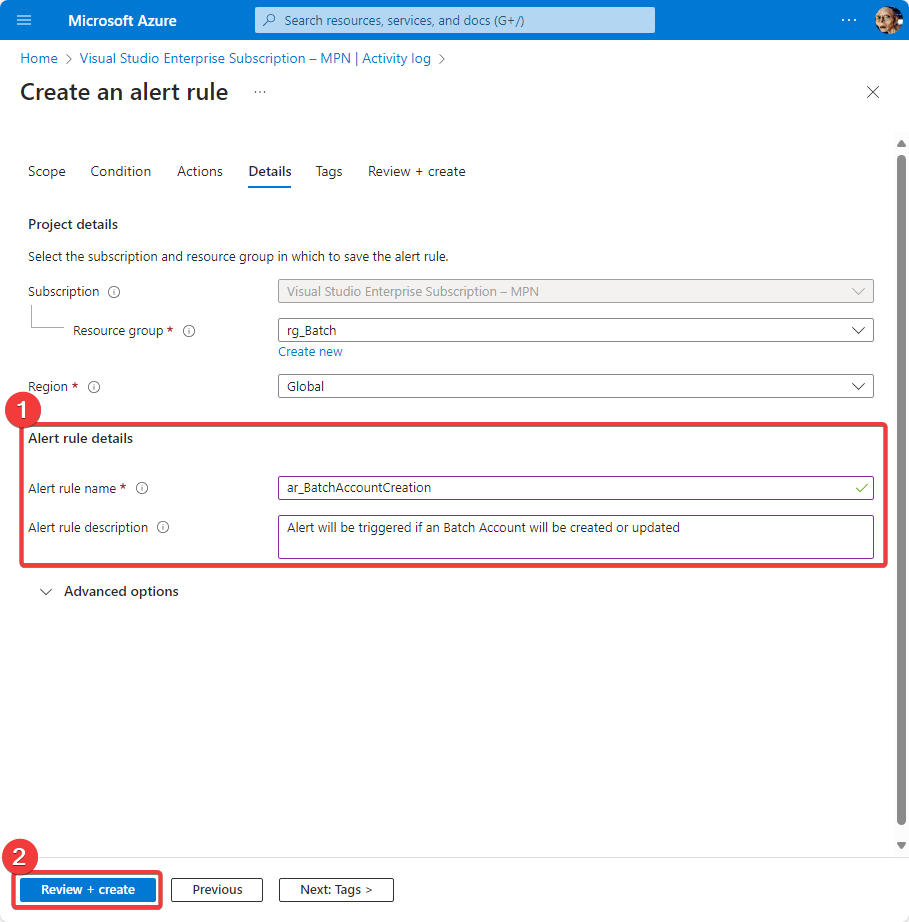
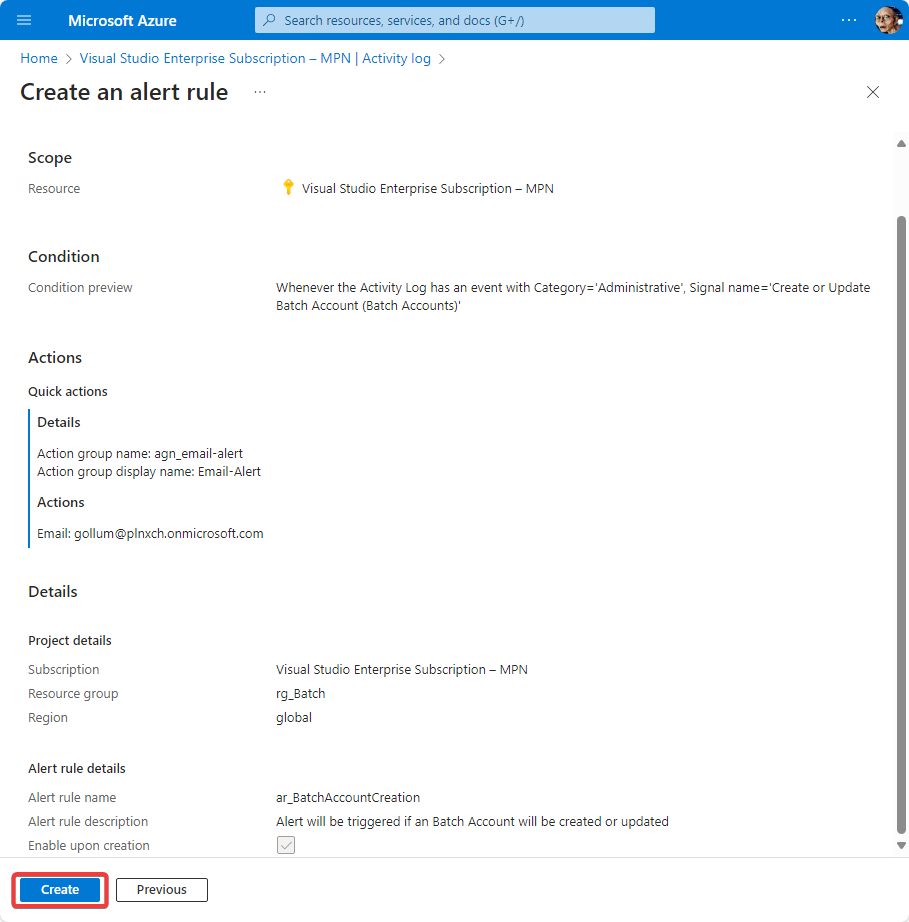
- Then in section
Detailsname your rule and give a description (sixth screenshot) - as last action (see seventh screenshot) review your settings and save the alert rule You are done. Now everytime someone creates or updates an Batch Account in the defined subscription you will get an alert by email.
To list all defined alerts go to https://portal.azure.com/#view/Microsoft_Azure_Monitoring_Alerts/AlertRulesBlade (make sure that the filters are correct for your use case).
If now a Batch Account is created or modified you will get an alert:

Summary
As you can see there are many possibilities to address the basic issue of misusing Azure Batch. You should always keep in mind that cloud providers have usuability first in mind - not security first. The sections before showed some counter measures - of course there are more. Due the mind set of the provides you have to act to protect your environment.
Further Reading
- Azure Batch based Incident Response Case: https://dfir.ch/posts/azure_batch/
- What is Azure Batch: https://learn.microsoft.com/en-us/azure/batch/
- Phishing resistant Multifactor Authentication methods: https://learn.microsoft.com/en-us/entra/identity/authentication/concept-authentication-strengths#built-in-authentication-strengths
- Azure RBAC: https://learn.microsoft.com/en-us/azure/role-based-access-control/overview
- Entra ID RBAC: https://learn.microsoft.com/en-us/entra/identity/role-based-access-control/custom-overview
- Differences between Azure and Entra ID Roles explained: https://learn.microsoft.com/en-us/azure/role-based-access-control/rbac-and-directory-admin-roles
- Cloud Adaption Framework (CAF) for Platforms: https://learn.microsoft.com/en-us/azure/cloud-adoption-framework/scenarios/app-platform/ready
- Lock Inheritance: https://learn.microsoft.com/en-us/azure/azure-resource-manager/management/lock-resources?tabs=json#lock-inheritance
- Alert Rule: https://learn.microsoft.com/en-us/azure/azure-monitor/alerts/alerts-common-schema
- Find defined Alert rules in your tenant (by default filter is set to scope
Subscription; change to your needs): https://portal.azure.com/#view/Microsoft_Azure_Monitoring_Alerts/AlertRulesBlade