Nextcloud is a file sharing platform like Sharepoint. Providing SSO for this application for your Azure Active Directory users is easy - especially if you know which SAML properties you have to setup on both ends, Nextcloud and AAD. This article shows you how to do it.
Introduction
Nextcloud is a popular file sharing platform which can be hosted anywhere. Of course it makes only real sense if it is available for the internet. To make it convienint for your Azure Active Directory (AAD) users to use this platform it should provide SSO. In the following sections the procedure will be documented.
What you will get at the end:
- SSO with Nextcloud
- Automatic account provisioning within Nextcloud
- SP (Nextcloud) initiated authentication (means you call your Nextcloud URL and will be redirected to Azure AD for Authentication)
- IdP (AAD) initiated authentication (means you call Nextcloud as application from your user dashboard https://myapps.microsoft.com/ )
Known Issues:
- Logout from Nextcloud is not possible
- Even if you logout of AAD your session in Nextcloud is still valid until session expires
We will do the following steps:
- Install Nextcloud as a test instance with docker (super easy quick start)
- Setup SSO with Azure Active Directory
- Preparing Nextcloud for SSO
To follow this article you need the following:
- A publicly reachable Linux based VM with docker installed, eg. you can use the Oracle Free Tier Cloud offer: https://www.oracle.com/cloud/free/ . I will use Ubuntu 22.04 in this lab. For Tipps regarding network setup in the Oracle Cloud see my blog post .
- A DNS entry pointing to your VM (I will use
share.plnx.chin this documentation)
share.plnx.ch and certificates have to be adapted to your configuration. They are provided as examples only.Nextcloud Installation
As already mentioned we will use Nextcloud in a docker image. To simplify the setup process we will use the internal sqlite database.
The setup consists basically of two steps:
- Installation of a Reverse Proxy: we will use Traefik. It will also do the certificate handling provided by Let’s Encrypt.
- Installation of Nextcloud itself.
For the following steps I assume that you have successfully installed docker in your VM. To verify you could issue docker --version. On my VM I get following output:
ubuntu@plnx-srv01:~$ docker --version
Docker version 23.0.1, build a5ee5b1
Installation of Traefik
First we have to create a directory for persistent data of Traefik and we have to create a simple configuration file.
mkdir -p $PWD/traefik
Now create the config file ($PWD/traefik/traefik.yml) and put following content into it:
## traefik.yml

# Docker configuration backend
providers:
  docker:
    defaultRule: "Host(`{{ trimPrefix `/` .Name }}.docker.local`)"

# API and dashboard configuration
api:
  dashboard: true
  insecure: true

entryPoints:
  http:
    address: ":80"
  https:
    address: ":443"

certificatesResolvers:
  letsencrypt:
    acme:
      email: your-name@some-domain.tld
      storage: /letsencrypt/acme.json
      httpChallenge:
        entryPoint: http
your-name@some-domain.tld with your valid email address!After this preparation work we are ready to launch Traefik:
docker run -d -p 8080:8080 -p 80:80 -p 443:443 \
  -v $PWD/traefik/traefik.yml:/etc/traefik/traefik.yml \
  -v $PWD/traefik:/letsencrypt \
  -v /var/run/docker.sock:/var/run/docker.sock \
  --name traefik traefik
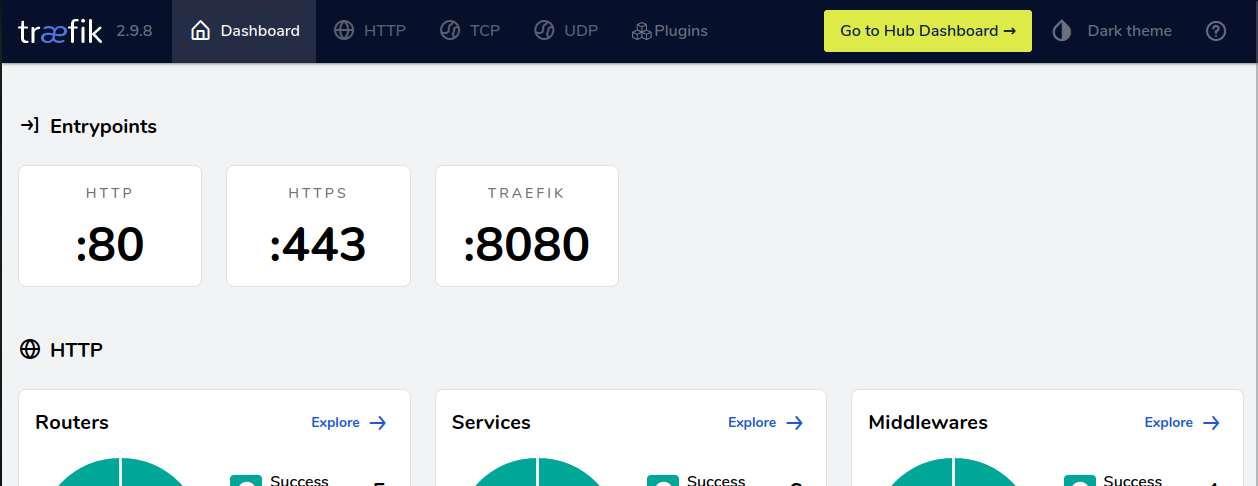
Now open your web browser and go to Url http://public-ip-of-your-vm:8080/ and you should see the dashboard of Traefik.
Installation of Nextcloud
Again first we have to make sure that we have the required directories for persistent data. For Nextcloud we need more than one directory - but can be created with a simple single command:
mkdir -p $PWD/nextcloud/config $PWD/nextcloud/data $PWD/nextcloud/custom_apps
Next step is to start the corresponding docker image:
docker run -d -p 8180:80 --env TRUSTED_PROXIES="172.17.0.3/16" \
  --env OVERWRITEPROTOCOL=https \
  --label "traefik.enable=true" \
  --label "traefik.http.routers.nextcloud.rule=Host(\`share.plnx.ch\`)" \
  --label "traefik.http.routers.nextcloud.tls.certresolver=letsencrypt" \
  --label "traefik.http.routers.nextcloud.middlewares=nc-redrex01,nc-redrex02" \
  --label "traefik.http.middlewares.nc-redrex01.redirectregex.permanent=true" \
  --label "traefik.http.middlewares.nc-redrex01.redirectregex.regex=https?://([^/]*)/.well-known/(card|cal)dav" \
  --label "traefik.http.middlewares.nc-redrex01.redirectregex.replacement=https://\${1}/remote.php/dav/" \
  --label "traefik.http.middlewares.nc-redrex02.redirectregex.permanent=true" \
  --label "traefik.http.middlewares.nc-redrex02.redirectregex.regex=https?://([^/]*)(/.well-known[^#]*)" \
  --label "traefik.http.middlewares.nc-redrex02.redirectregex.replacement=https://\${1}/index.php\${2}" \
  -v $PWD/nextcloud/config:/var/www/html/config \
  -v $PWD/nextcloud/data:/var/www/html/data \
  -v $PWD/nextcloud/custom_apps:/var/www/html/custom_apps \
  --name nextcloud nextcloud
your.dns.entry with your previously created DNS entry for your VM!Shortly after you started your Nextcloud docker image it should be available publicly. Just go to https://your.dns.entry/ and you should get the initial setup prompt from Nextcloud:
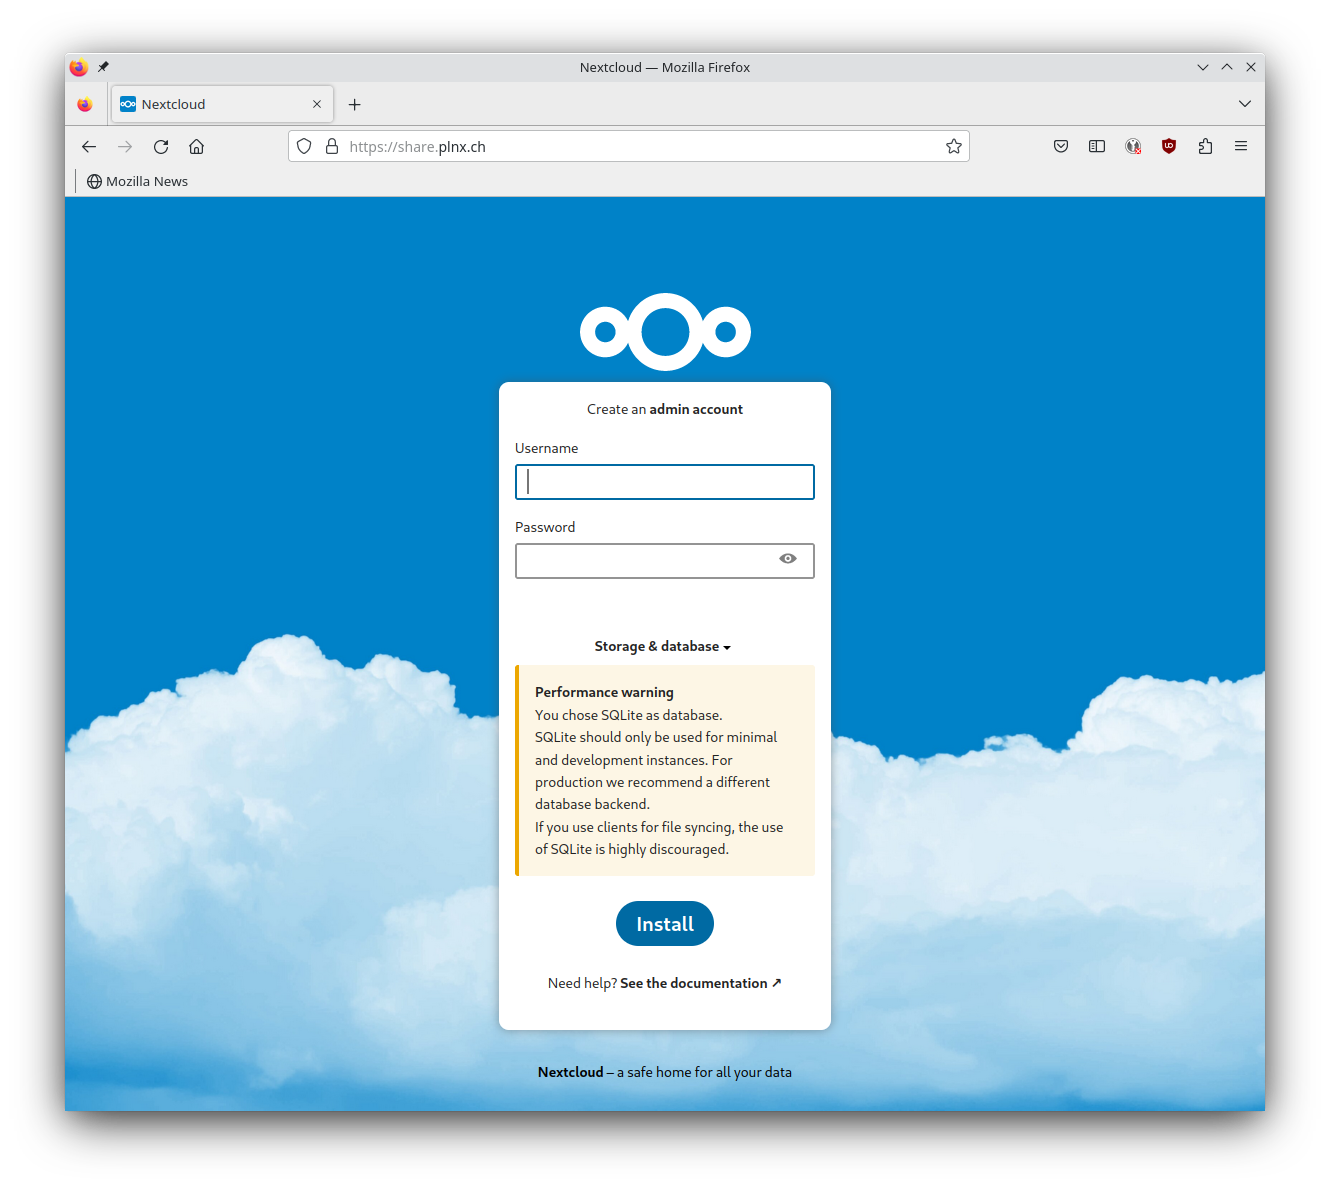
sqlite will be used as backend which is only a valid option for testing purposes.
Finish Installation by defining the admin account. You will get asked if you wan to install recommended apps - just skip this step because for our use case those are not needed.
Now one final tweak is needed to make sure that pretty Urls are working:
ubuntu@plnx-srv01:~$ docker exec --user www-data nextcloud php occ maintenance:update:htaccess
.htaccess has been updated
Setup Enterprise Application in Azure Active Directory
Create Enterprise Application
To be able to setup SSO with AAD we have to create an Enterprise Application with corresponding SAML authentication enabled.
- Log into Entra Portal https://entra.microsoft.com/
- under
ApplicationsselectEnterprise applications - Hit
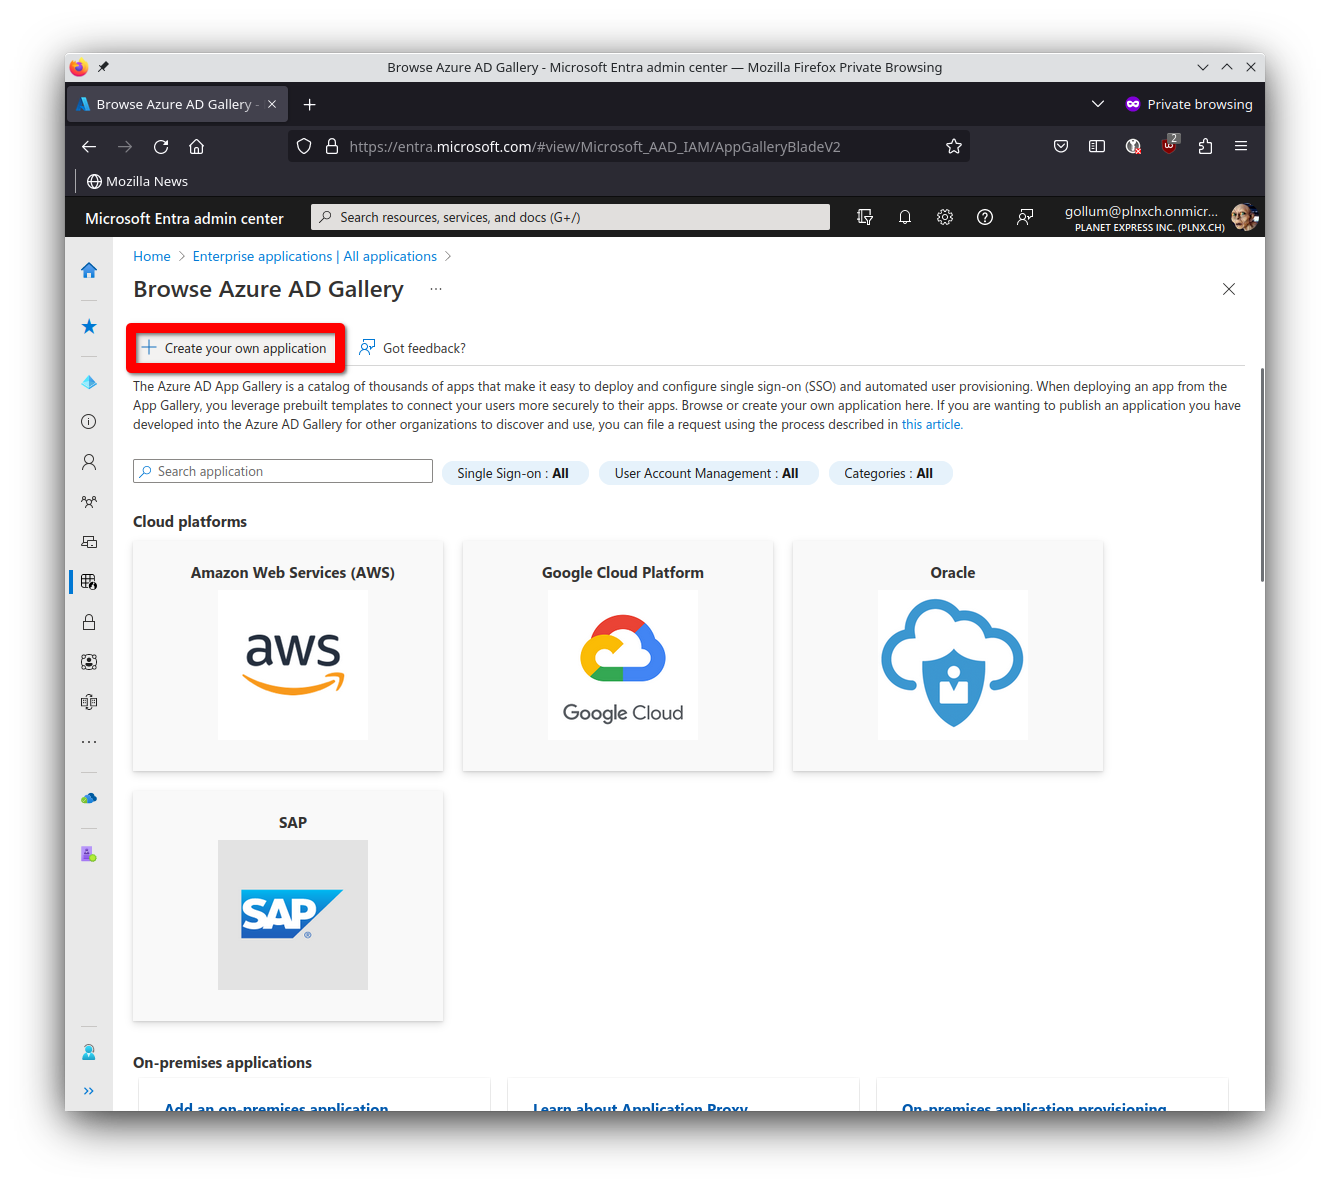
New application - Hit
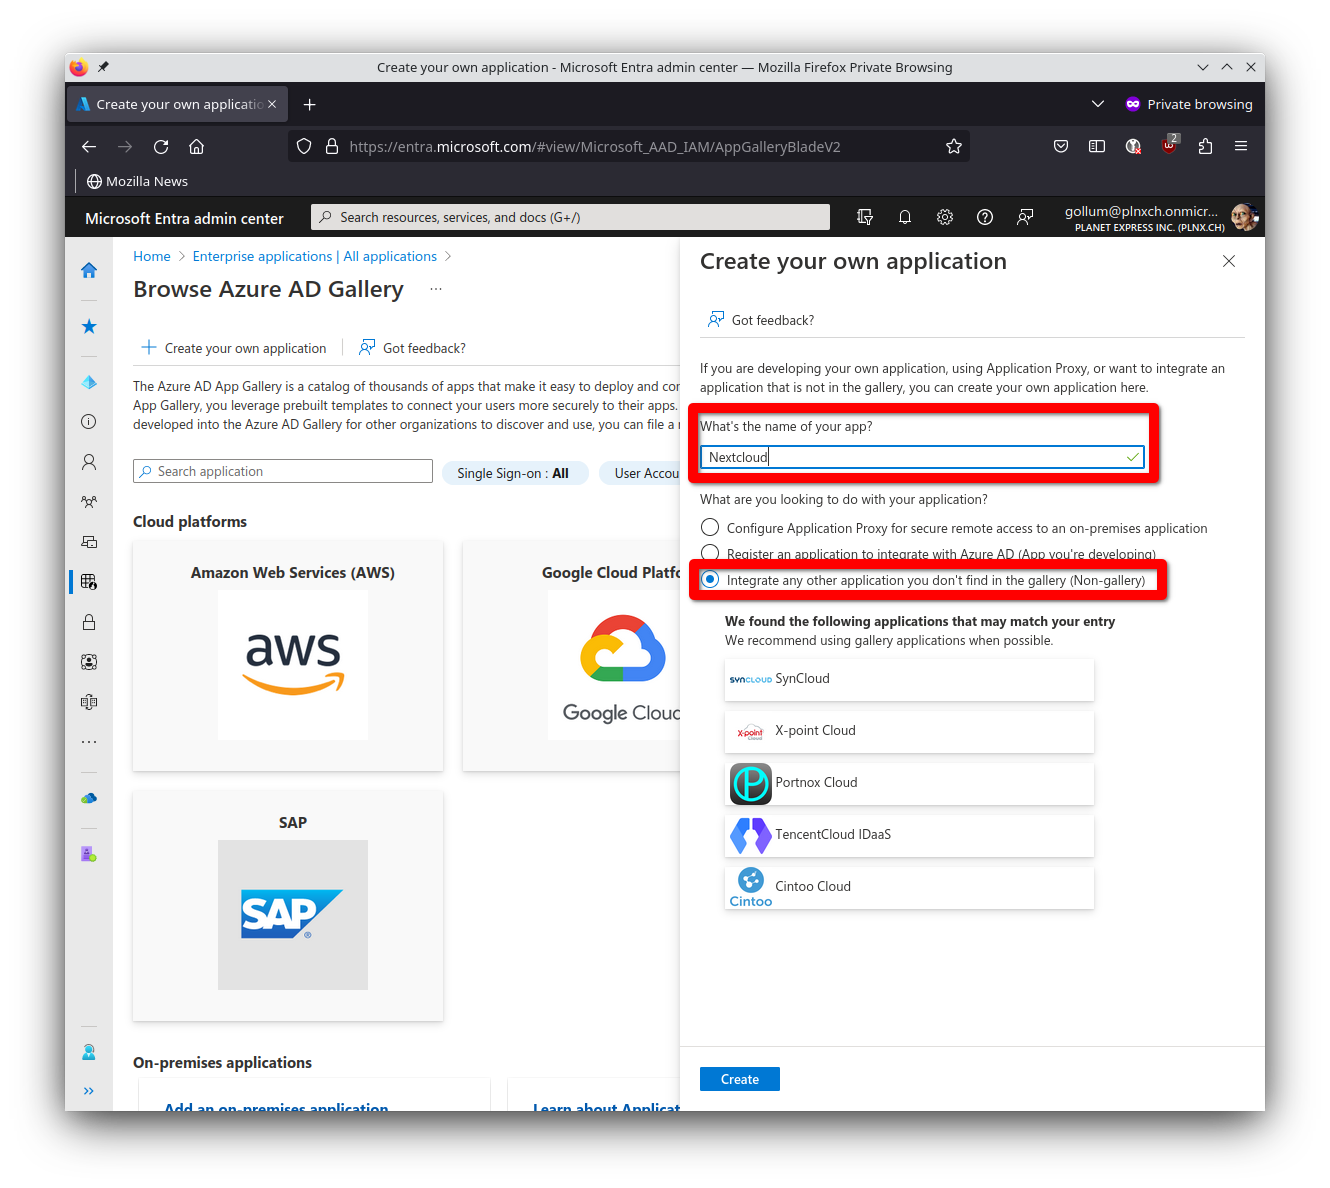
Create your own application(there is no pre-defined application for Nextcloud)
- Fill in following information
- What’s the name of your app?
Nextcloud - What are you looking to do with your application?
Integrate any other application you don't find in the gallery (Non-gallery) - Hit on
Create
- What’s the name of your app?
Assign Users and/or Groups
Only assigned users and/or groups can use this application. So you have to assign corresponding users/groups to this application.
- Select
Users and groups - Hit on
Add user/group - Select appropriate user and/or group and hit
Assign
Setup single sign-on method
Now we have to define the single sign-on method.
- Select
Single sign-on - Select
SAML
Selecting single sign-on method SAML.
Set up Single Sign-On with SAML Overview.
Now we have to fill in the required information for SAML authentication according to the sections:
Basic SAML Configuration
- Identifier:
https://share.plnx.ch/apps/user_saml/saml/metadata - Reply URL (Assertion Consumer Service URL):
https://share.plnx.ch/apps/user_saml/saml/acswith index1 - Sign on URL (Optional):
https://share.plnx.ch/login - Relay State (Optional): (left it empty)
- Logout Url (Optional): (left it empty)
- Hit
Save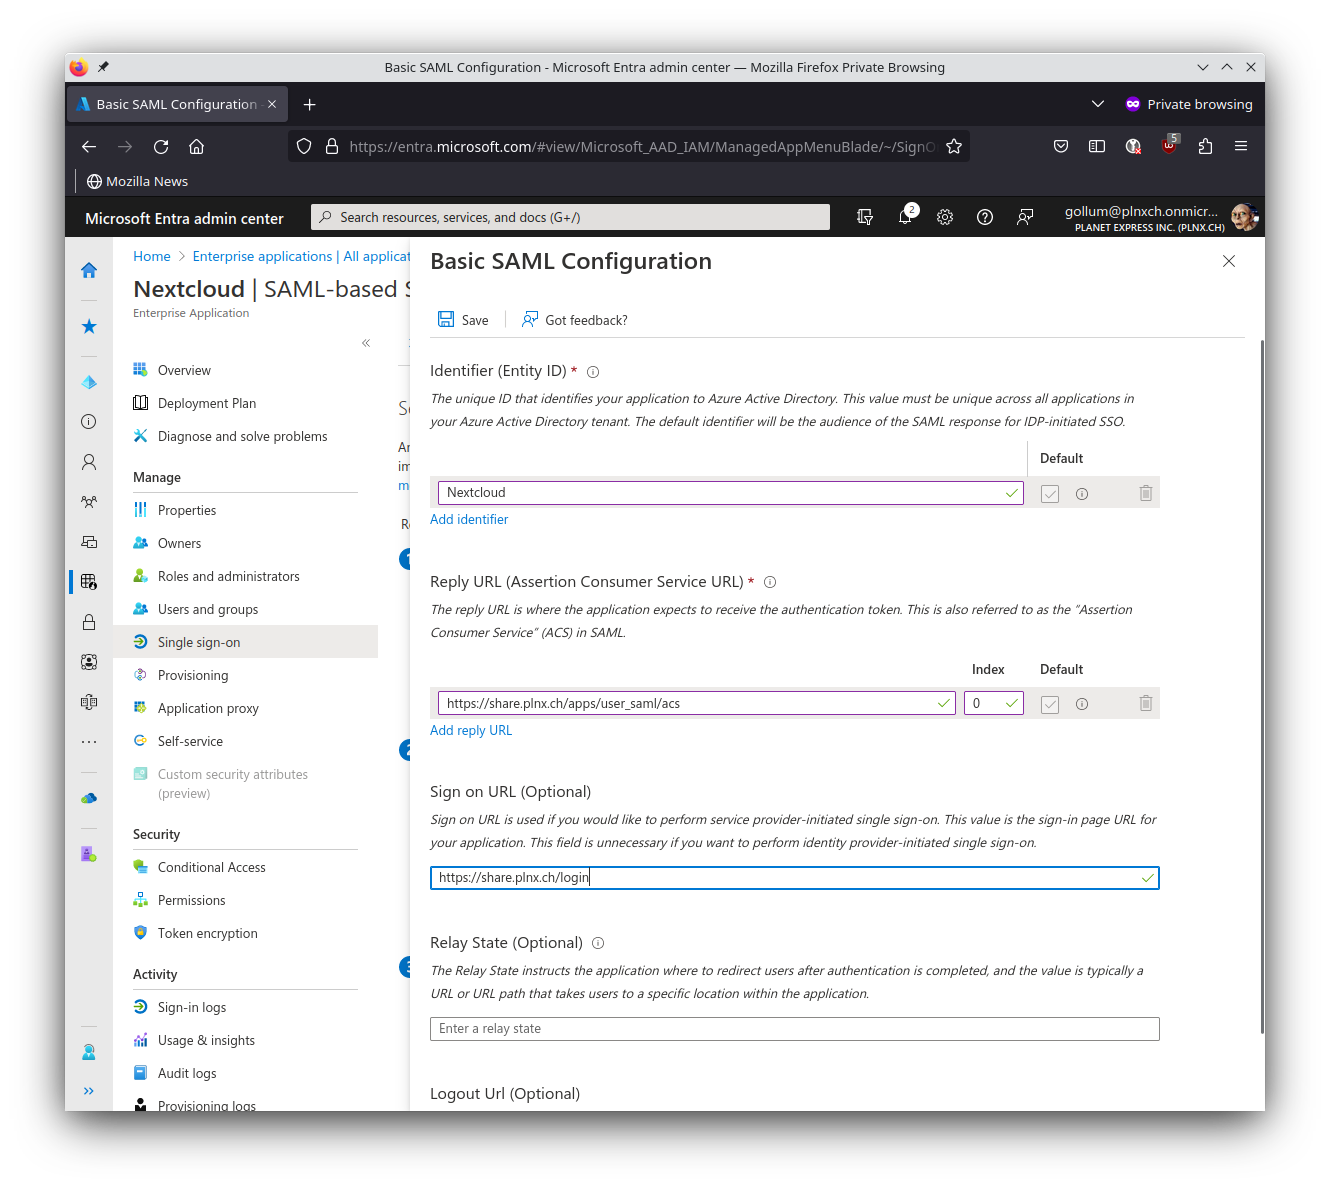
Basic SAML settings for Nextcloud.
Attributes & Claims
First we have to change the existing required claim for Unique User Identifier:
- Name:
nameidentifier(can not be changed) - Namespace:
http://schemas.xmlsoap.org/ws/2005/05/identity/claims(can not be changed) - Name identifier format:
Email address - Source:
Attribute - Source attribute:
user.mail - Hit
Save
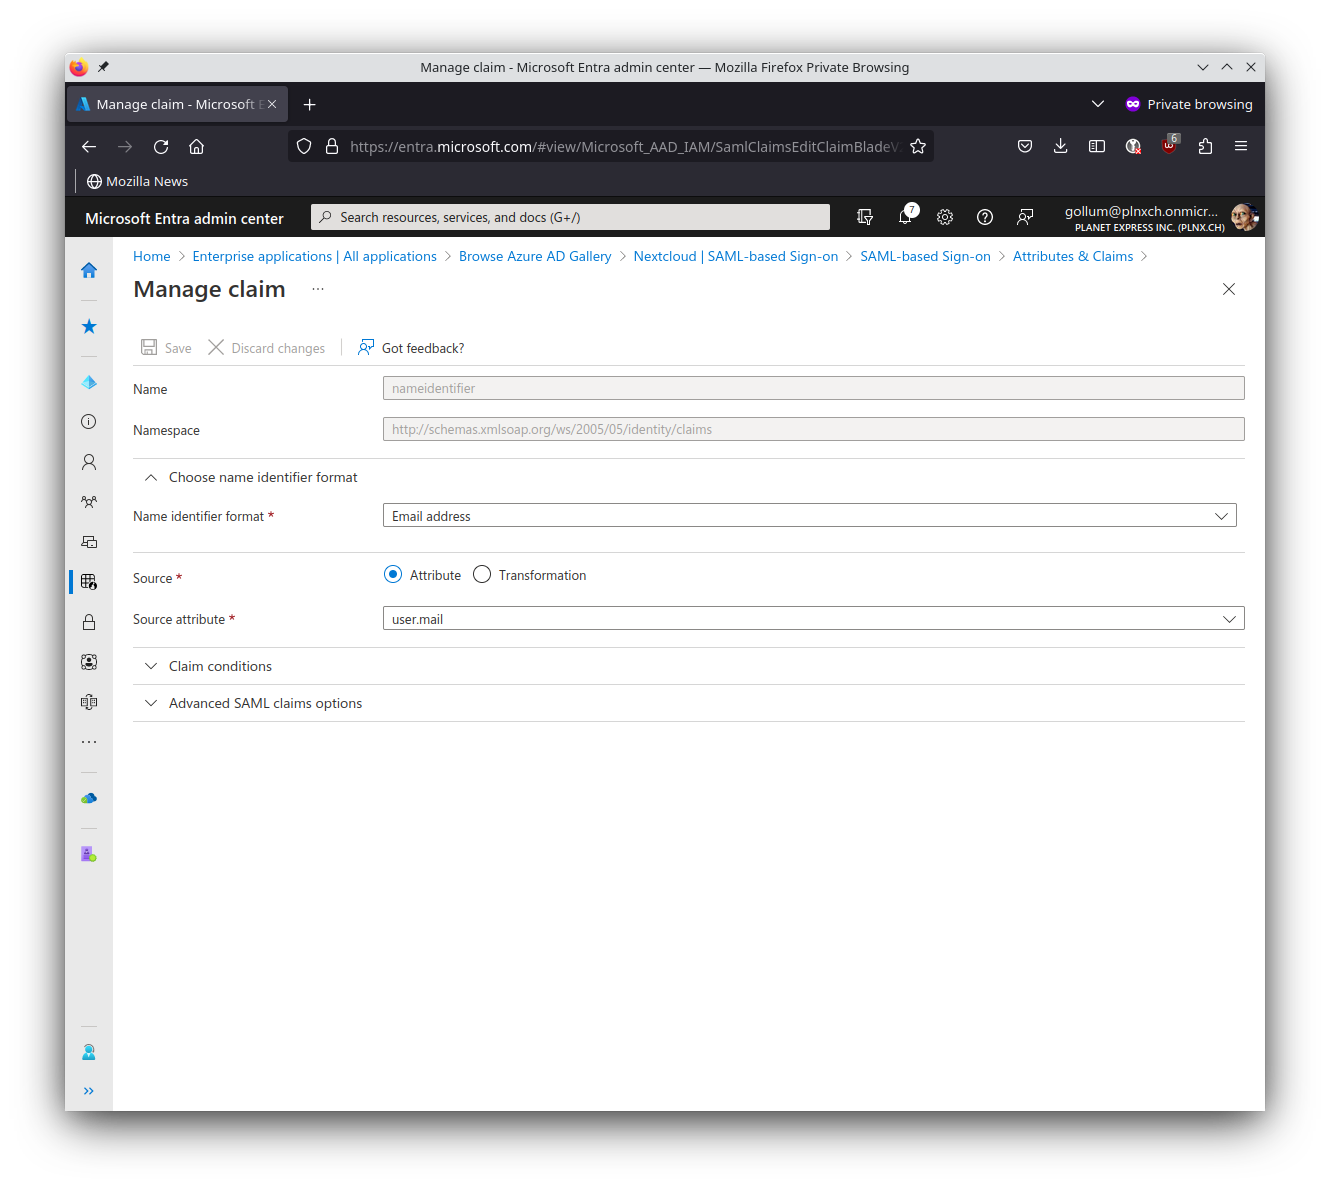
nameidentifier (should be already defined as showed here).
I always try to stick to the defaults if possible. For the Nextcloud integration we have to add additional claims.
- Name:
displayname - Namespace:
http://schemas.microsoft.com/identity/claims - Source:
Attribute - Source attribute:
user.displayname - Hit
Save
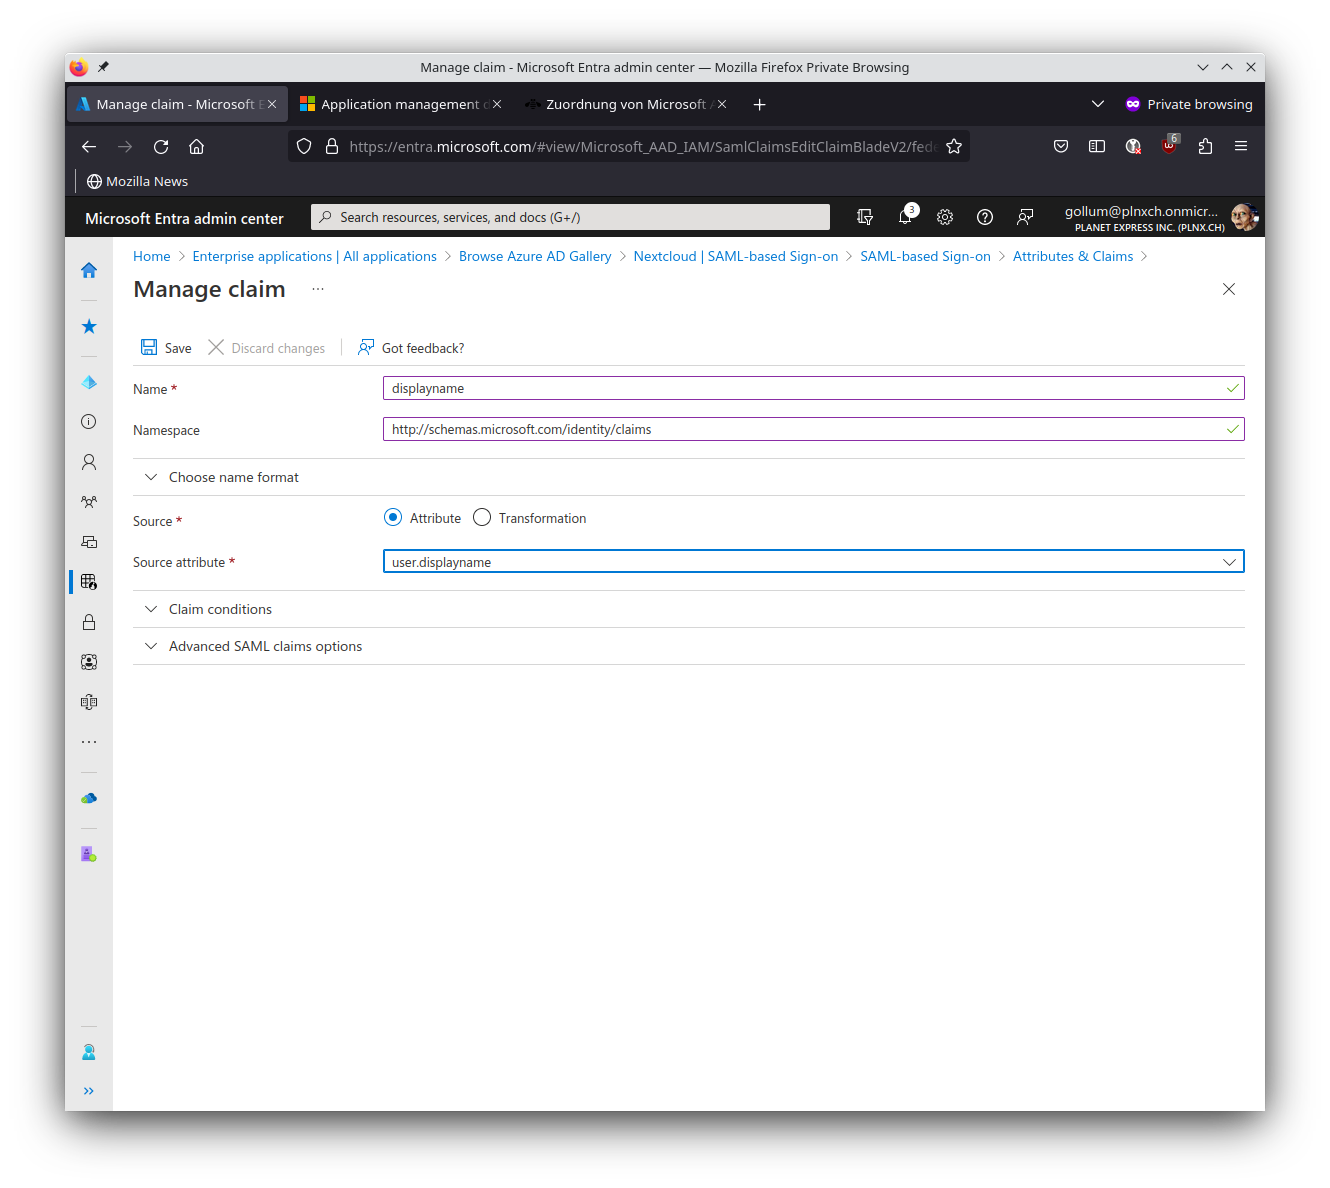
displayname.
Next claim we have to define:
- Name:
name - Namespace:
http://schemas.microsoft.com/identity/claims - Source:
Attribute - Source attribute:
user.userprincipalname - Hit
Save
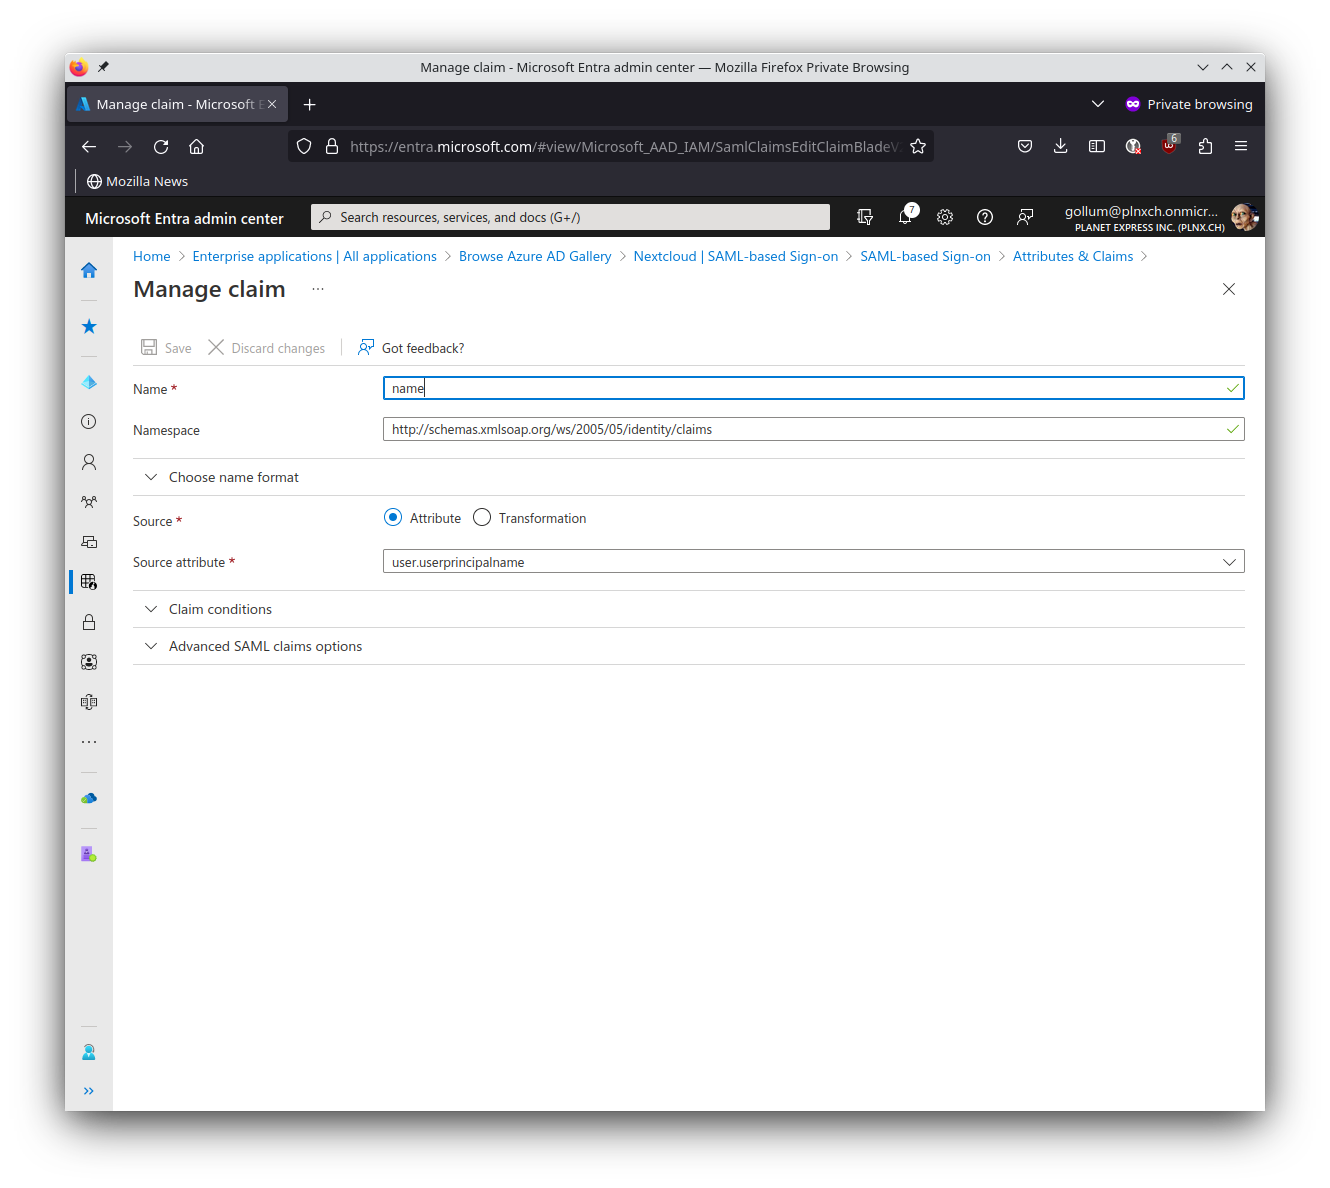
name which will be filled with user.userprincipalname.
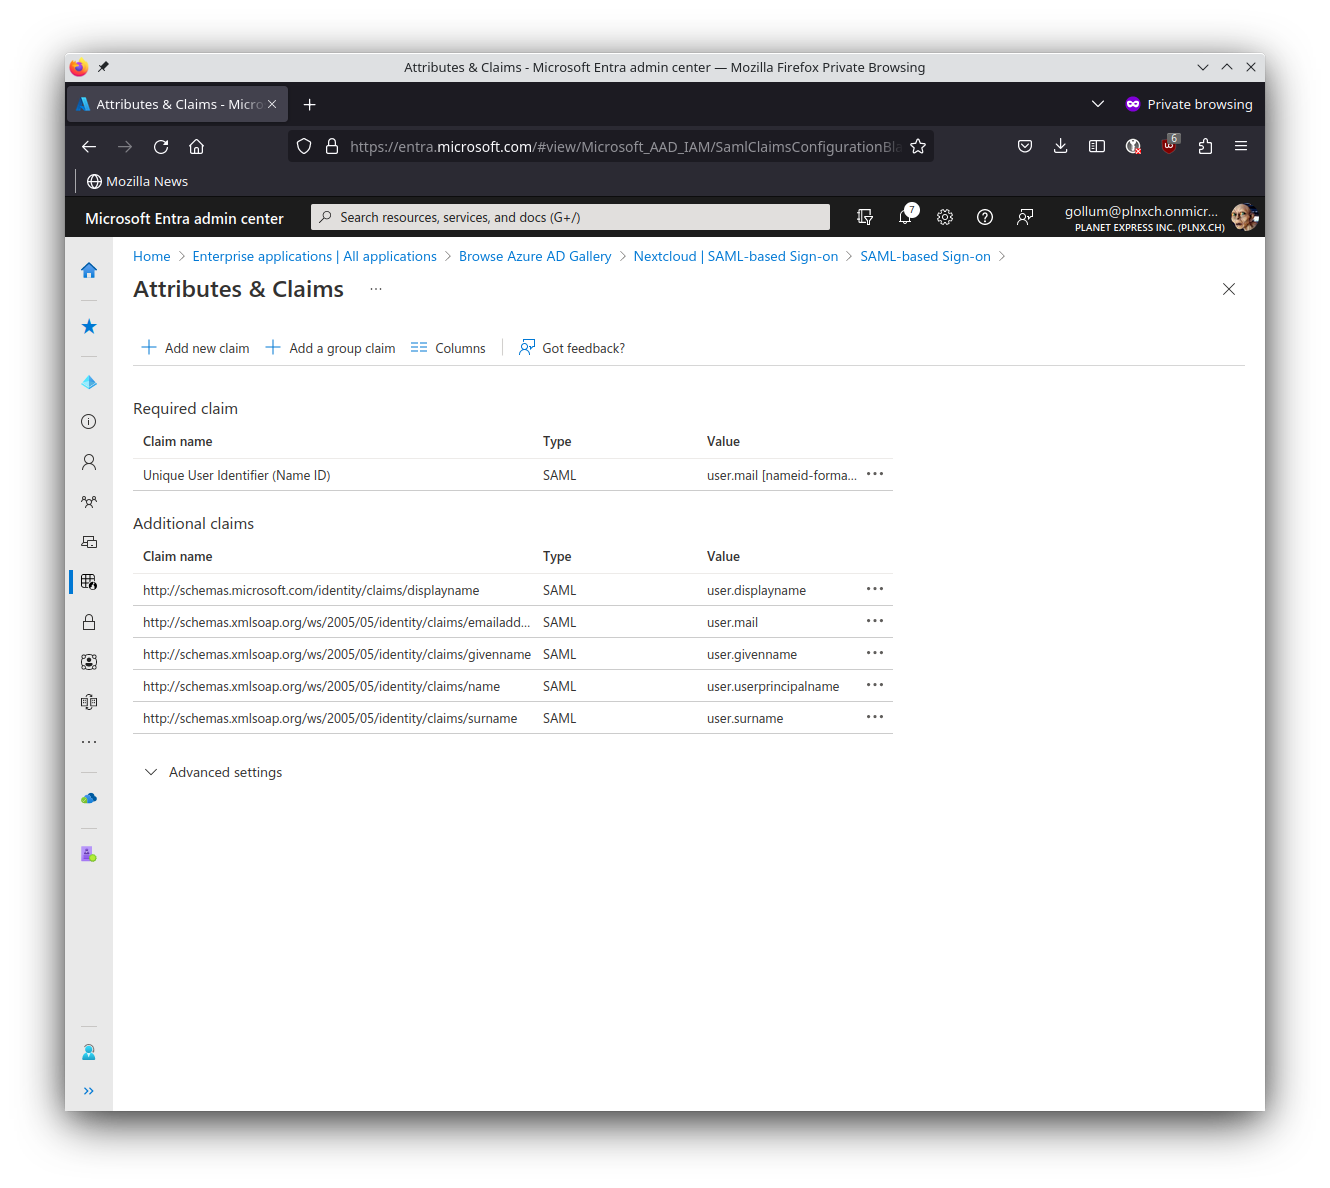
Here you see the summary of all defined Attributes & Claims:
SAML Certificates
Download here the Certificate in Base64 Format - we need it later when setting up Nextcloud for SSO.
The certificate looks like:
-----BEGIN CERTIFICATE-----
MIIC8DCCAdigAwIBAgIQMn0lYq4SvK5PdmCQ8sAzUzANBgkqhkiG9w0BAQsFADA0MTIwMAYDVQQD
EylNaWNyb3NvZnQgQXp1cmUgRmVkZXJhdGVkIFNTTyBDZXJ0aWZpY2F0ZTAeFw0yMzAyMjIxNjEy
...
6k/DHC106BMpVJk2rhRHYl/NzJOTWjvVbFZ0Z3UKIJFzJs6qUtpNMWlMLJar9lP0bAo+XNkZhX3o
HGfyxr17AAOAMbfN/c2g
-----END CERTIFICATE-----
Set up Nextcloud
Copy following URLs for later use when setting up Nextcloud for SSO:
- Login URL:
https://login.microsoftonline.com/0ae2e4bc-355f-4422-be74-bd55df366c42/saml2 - Azure AD Identifier:
https://sts.windows.net/0ae2e4bc-355f-4422-be74-bd55df366c42/
0ae2e4bc-355f-4422-be74-bd55df366c42). Use your URLs with your own tenantId!Setup Nextcloud for SSO
Application installation
Now we have to prepare Nextcloud for SSO. By default Nextcloud is not able to do SSO - for this purpose we have to install a so called “App”. This are add-ons to extend functionality of Nextcloud.
- Just go to the Menu in the top right corner and hit
Apps. - Select
Featured apps(on the left side) - Search for
SSO & SAML authentication; hit there the buttonDownload and enable(probably you get asked for your admin password)
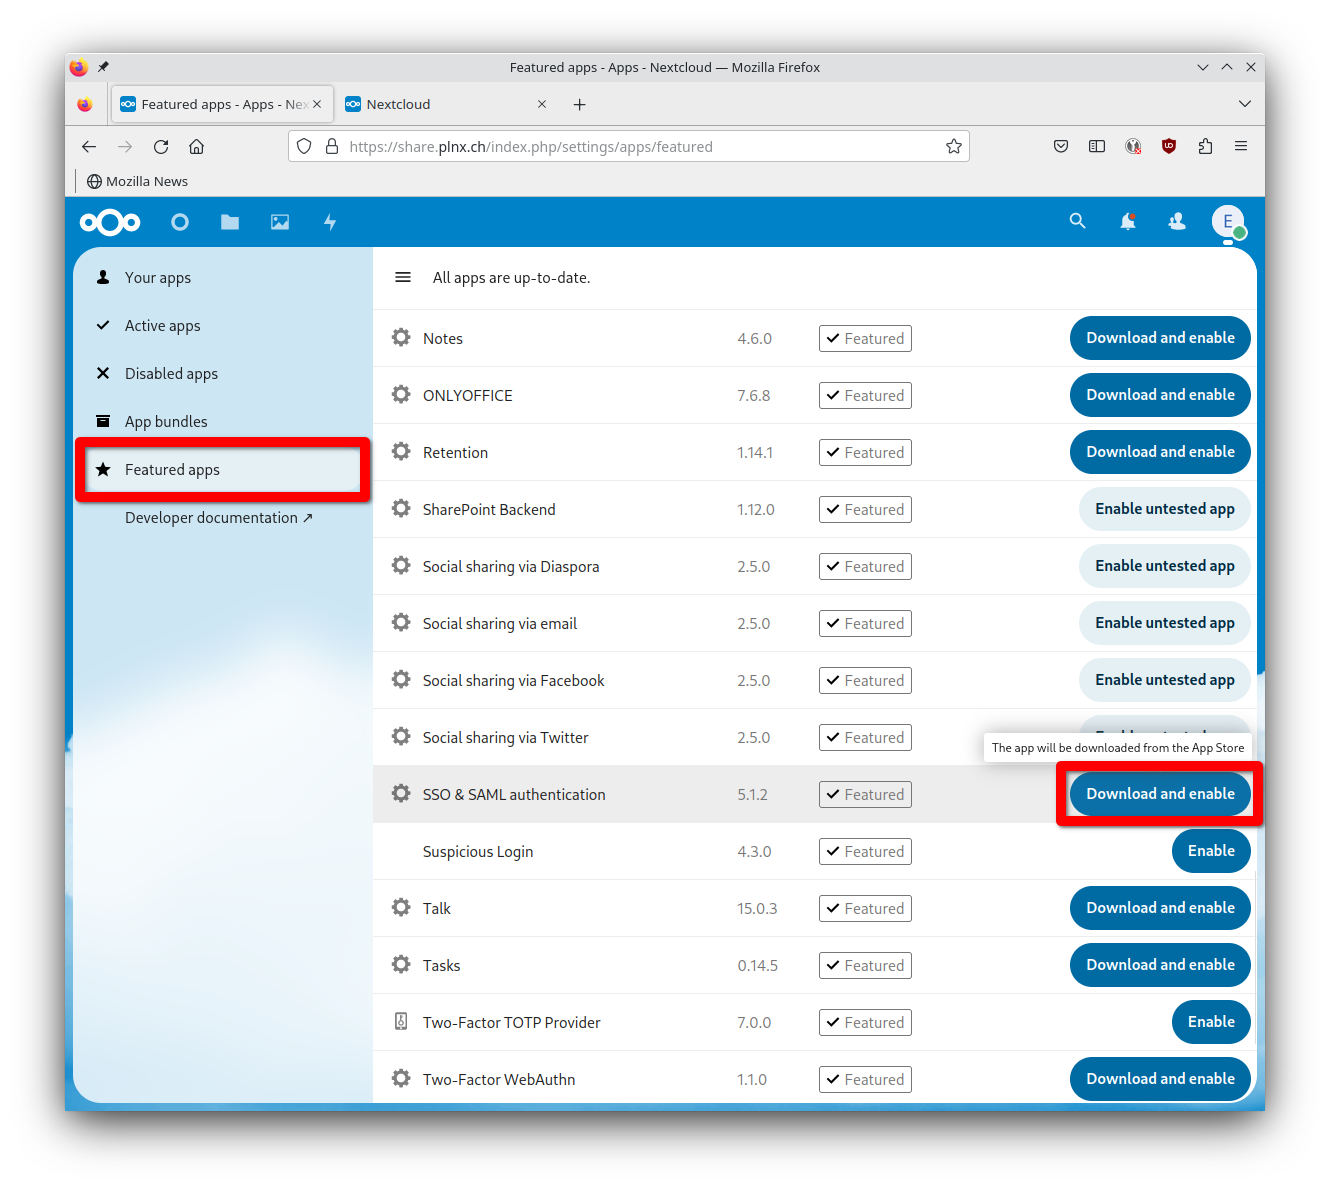
- Just go to the Menu in the top right corner and hit
Administration settings. - Search for
SSO & SAML authenticationin theAdministrationsection - Hit on
Use built-in SAML authentication

Use built-in SAML authentication.
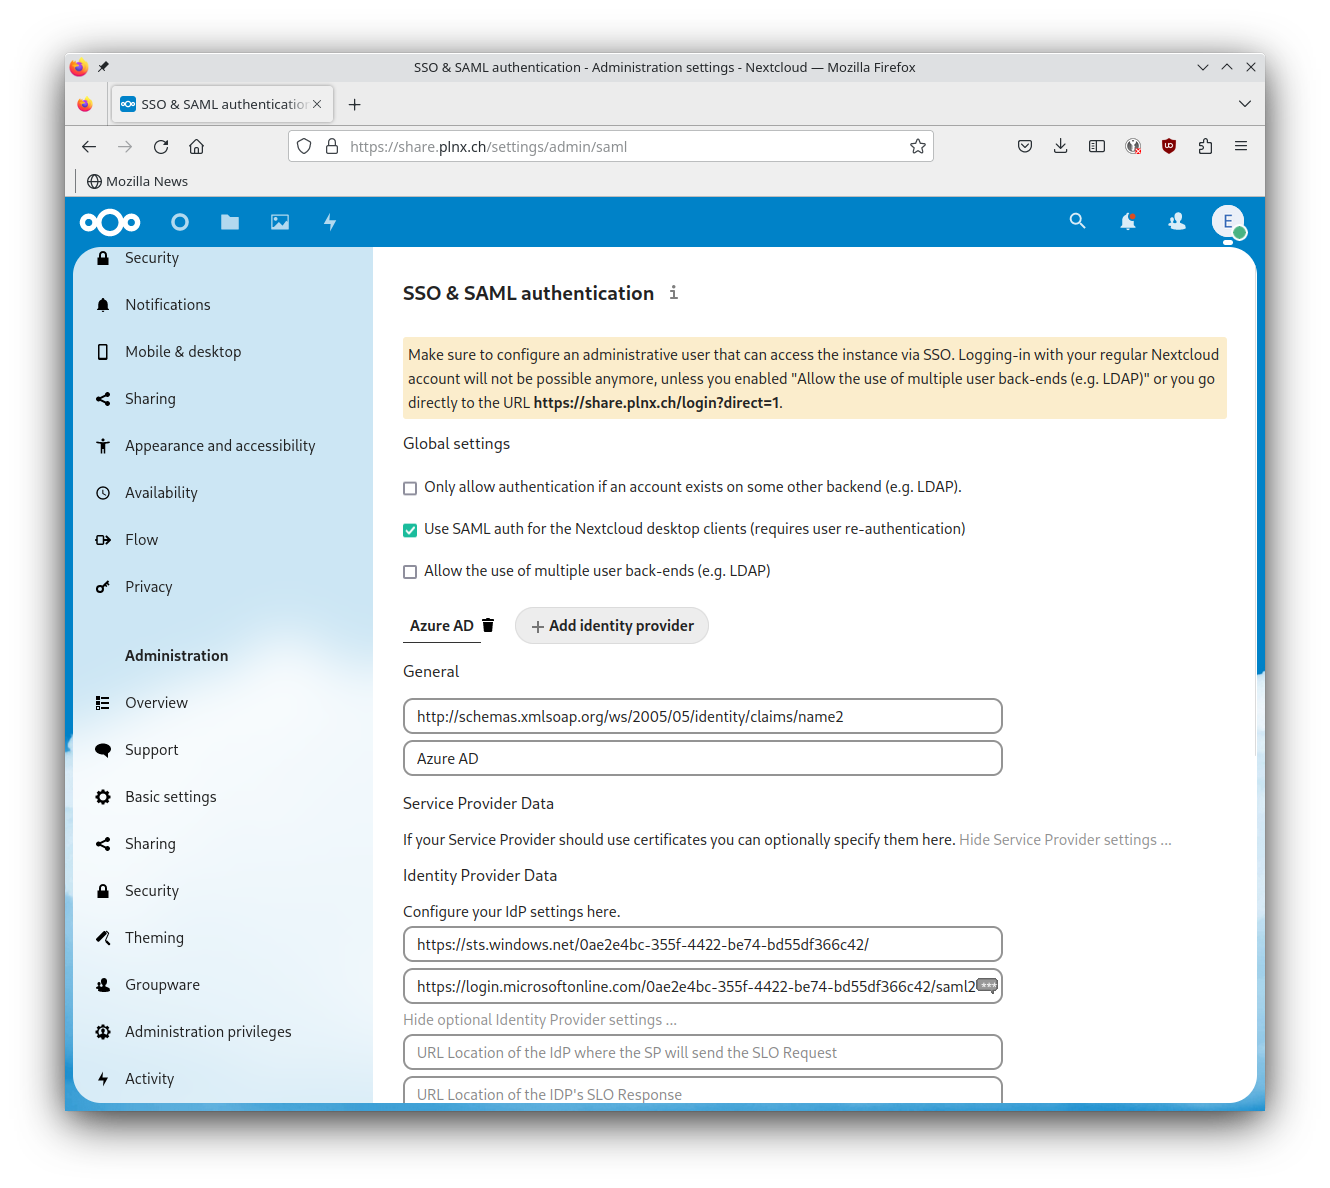
Setup Identity Provider
General
- Attribute to map the UID to:
http://schemas.xmlsoap.org/ws/2005/05/identity/claims/name - Optional display name of the identity provider:
Azure AD
Service Provider Data
We don’t have to fill in any thing in this section.
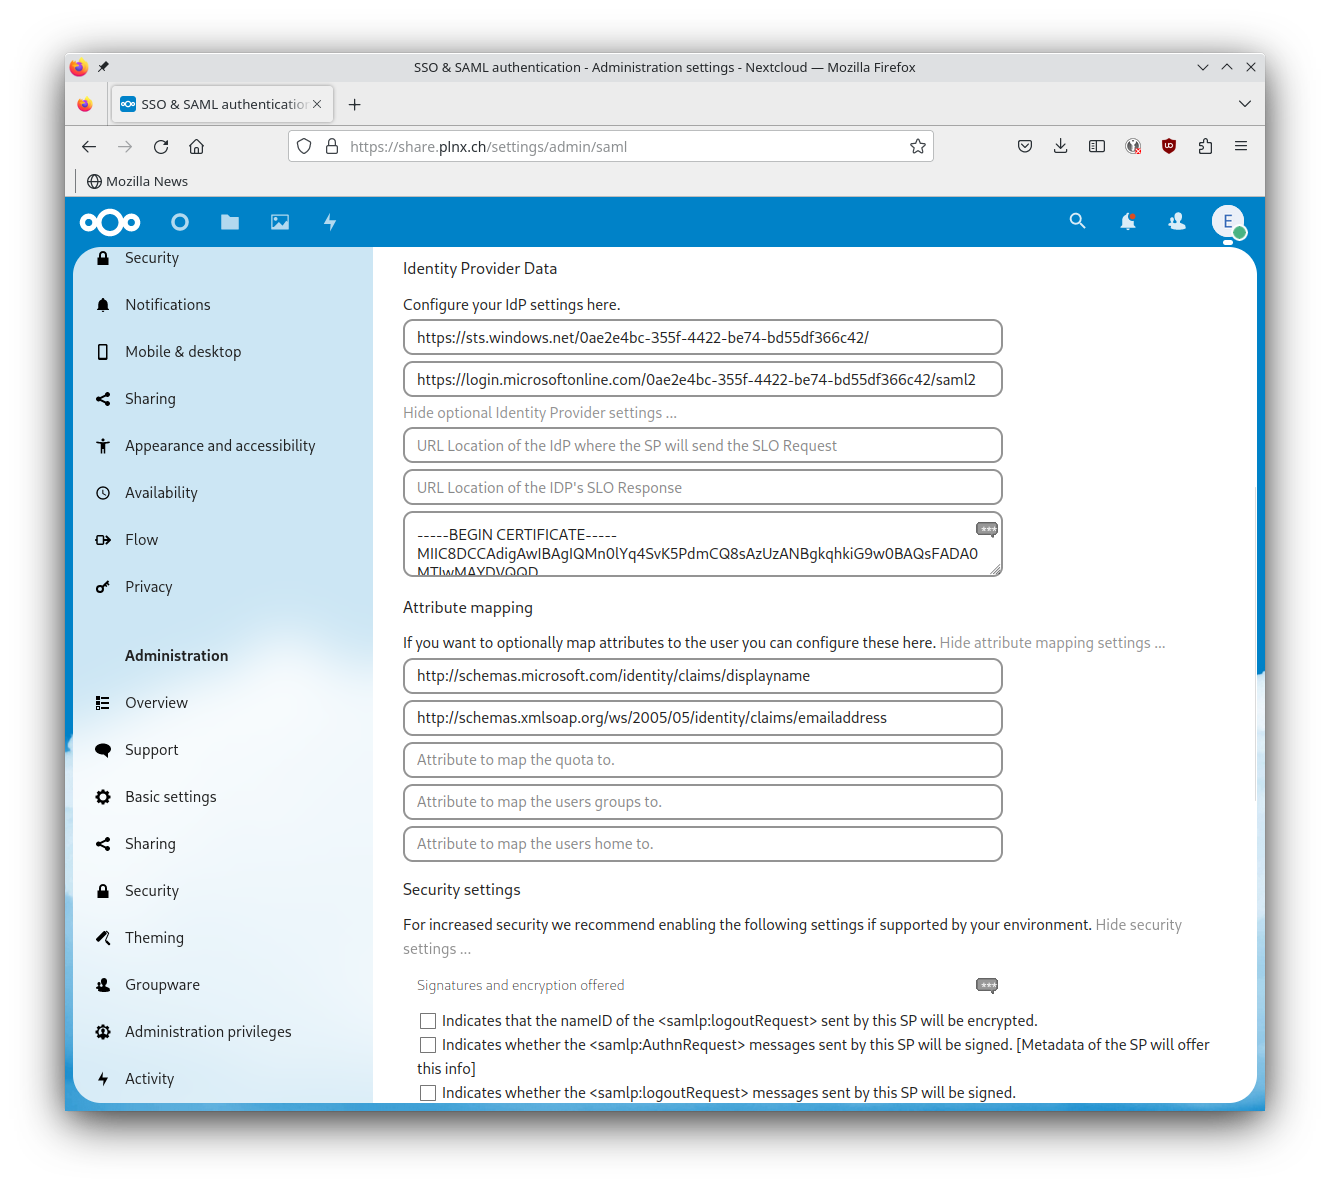
Identity Provider Data
- Identifier of the IdP entity (must be URI):
https://sts.windows.net/0ae2e4bc-355f-4422-be74-bd55df366c42/(value you saved for later use in section Set up Nexcloud in AAD). - URL Target of the IdP where the SP will send the Authentication Request Message:
https://login.microsoftonline.com/0ae2e4bc-355f-4422-be74-bd55df366c42/saml2(value you saved for later use in section Set up Nexcloud in AAD).
Expand optional Identity Provider settings:
- Public X.509 certificate of the IdP: Paste in Public certificate of your Enterprise Application (value you saved for later use in section SAML Certificates in AAD).
Attribute mapping
Expand attribute mapping settings:
- Attribute to map the displayname to:
http://schemas.microsoft.com/identity/claims/displayname - Attribute to map the email address to:
http://schemas.xmlsoap.org/ws/2005/05/identity/claims/emailaddress - Attribute to map the quota to: (left it empty)
- Attribute to map the users groups to: (left it empty)
- Attribute to map the users home to: (left it empty)
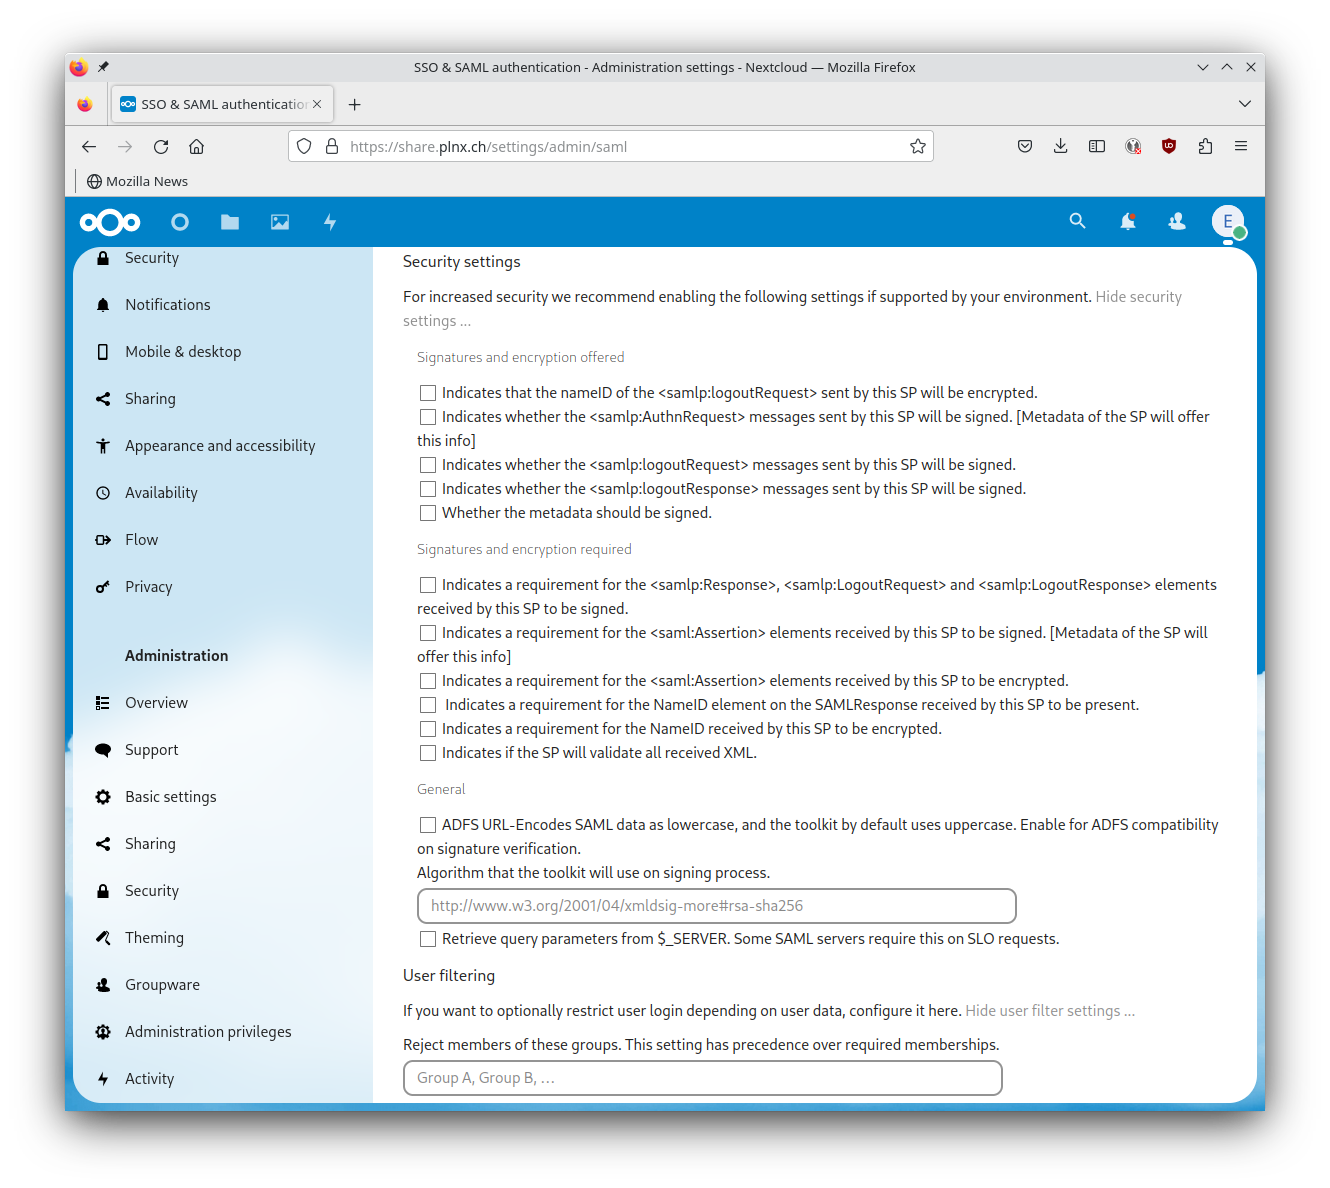
Security settings
We don’t have to fill in any thing in this section.
User filtering
We don’t have to fill in any thing in this section.
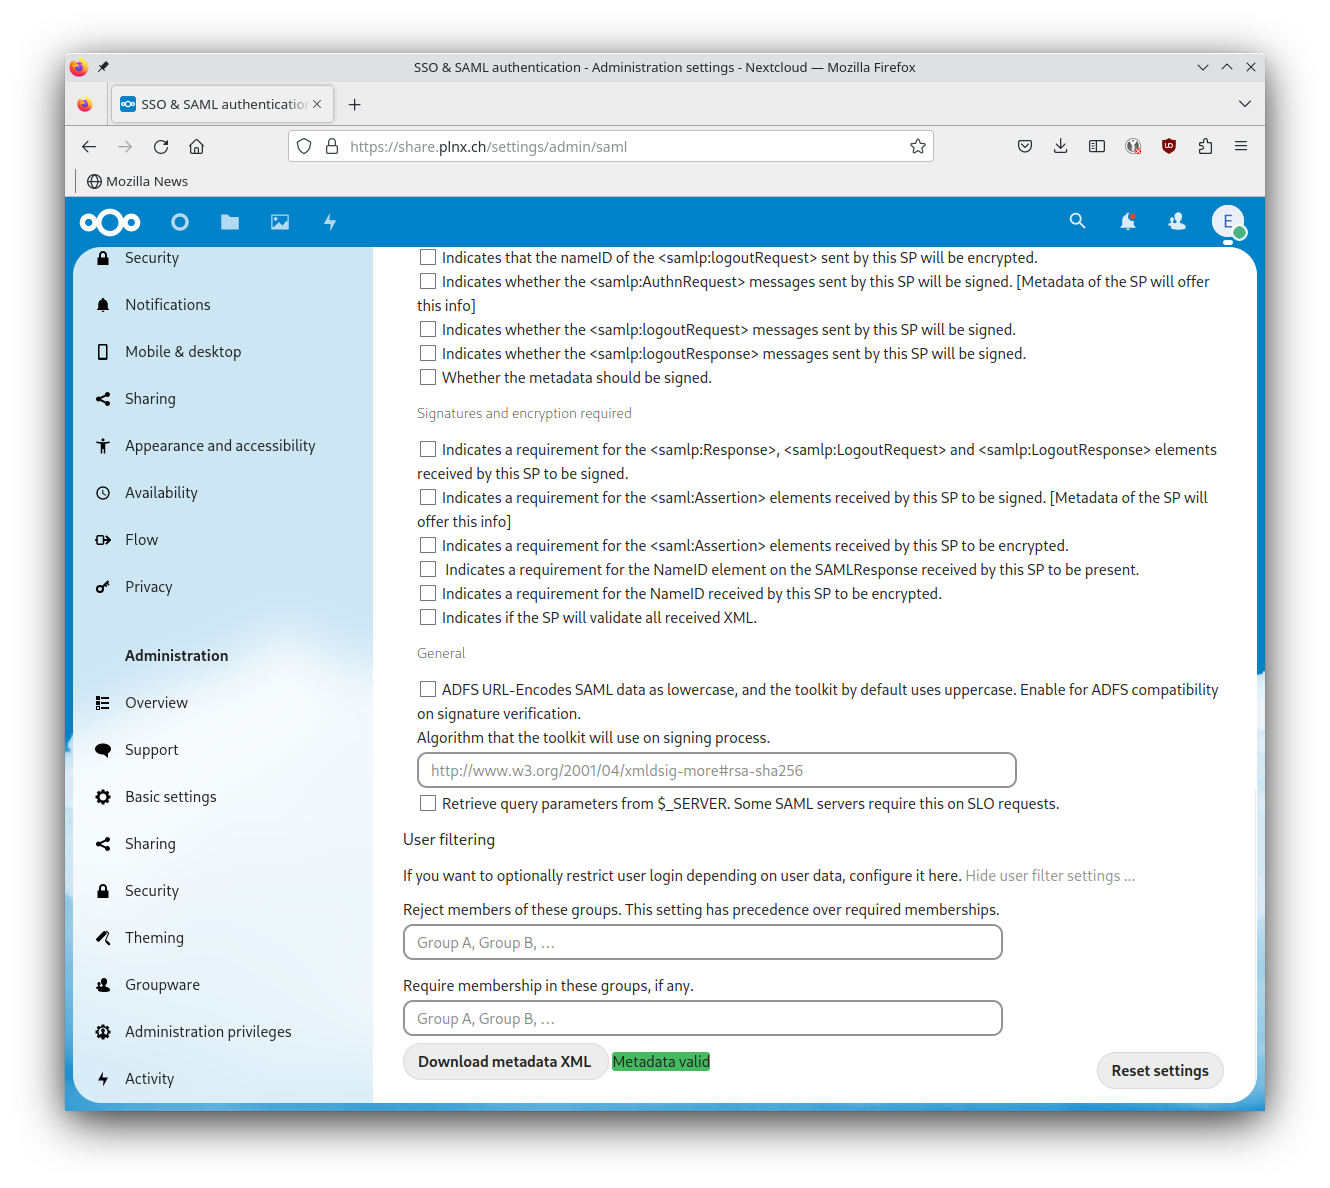
Saving config
Nextcloud will automatically save as soon as you leave a field.
Download metadata XML a green message Metadata valid.To summarize here are all settings as screenshot:
Result
Your app “Nextcloud” is now listed in “MyApps” (https://myapps.microsoft.com/ ) and available for users like other applications with single sign-on.

Accessing Nextcloud from https://myapps.microsoft.com/
How it looks like if you acccess Nextcloud from your “MyApps” portal page:
Accessing Nextcloud directly
This vidoe shows how the user authentication flow looks like if he is accessing Nextcloud directly with the corresponding URL https://share.plnx.ch/
:
Links
- Oracle Free Tier Cloud offer: https://www.oracle.com/cloud/free/
- My blog post Open port to Custom VM in Oracle Cloud
- Docker Installation on Ubuntu 22.04: https://www.digitalocean.com/community/tutorials/how-to-install-and-use-docker-on-ubuntu-22-04
- Traefik: https://traefik.io/
- Azure Active Directory Enterpise Applications: https://learn.microsoft.com/en-us/azure/active-directory/manage-apps/
- SAML Decoder: https://www.samltool.com/decode.php
- Nextcloud SSO documentation (behind Paywall): https://portal.nextcloud.com/article/Authentication/Single-Sign-On-(SSO)/Configuring-Single-Sign-On
- Other interesting blog regarding SSO in Nextcloud: https://blog.cubieserver.de/2022/complete-guide-to-nextcloud-saml-authentication-with-authentik/